
Add it to your home screen and it opens full screen: no browser bars, one tap away, and everything stays signed in. Free, nothing to download from an app store.
- Tap the Share button in your browser
- Scroll down and choose “Add to Home Screen”
- Open GrowSomeFood from your home screen
- Open your browser’s menu
- Choose “Add to Home screen” or “Install app”
- Open GrowSomeFood from your home screen

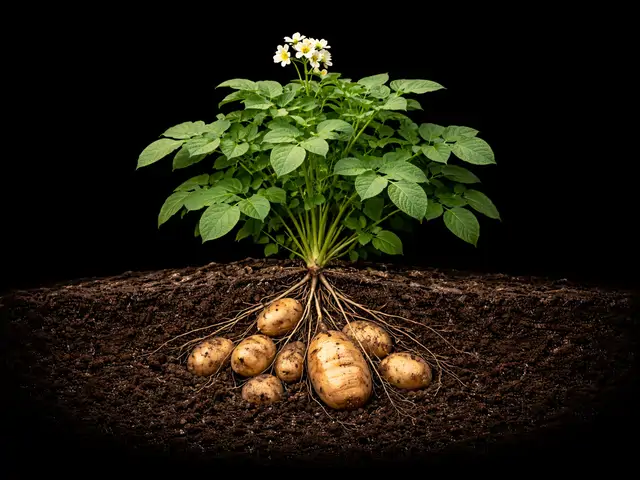
Potato
The world's great staple, grown from seed potatoes rather than seed: plant a piece, hill it up, and dig a meal's worth of tubers per plant a few months later.
Safety notes Only the tubers are edible - and only when not green. Leaves, stems, and the small tomato-like seed balls contain toxic solanine and are never edible. Trim away small green patches and any sprouts, and peel deeply. Discard whole tubers that are extensively green, badly sprouted, or that taste bitter or burn the tongue - cooking does not destroy solanine.
Overview
The potato is the crop that changed the world - a tender perennial from the Andes grown as an annual for the starchy tubers it swells underground. It's uniquely rewarding for a home garden: high-calorie, storable for months, and grown not from tiny seed but from seed potatoes (whole small tubers or cut pieces, each with an 'eye' that sprouts). Tuck a piece in the ground and it becomes a plant that returns five to twenty potatoes.
The one thing to knowIt's uniquely rewarding for a home garden: high-calorie, storable for months, and grown not from tiny seed but from seed potatoes (whole small tubers or cut pieces, each with an 'eye' that sprouts).
Quick facts
- Sprouts in
- 21 daysRange: 14–28 days
- Soil temperature
- 60 °FRange: 45–70 °F
- Height
- 30 inRange: 18–40 in
- Spread
- 24 inRange: 18–30 in
- Cold
- Killed by frostdamaged below 30°F
- Heat
- Struggles above 90°F
- Life cycle
- Grown as an annualBotanically a perennial
- Soil
- Well-drained
- Water
- Medium
- Plant spacing
- 12 inRange: 10–15 in
When to plant
Nothing is open today. Spring planting opens 5 months, Mar 13 to Apr 3.
- Plant tubers Mar 13 – Apr 3 Opens in 144 daysAbout 4 weeks before to 7 days before your last frost (Apr 10 here)Plant seed potato pieces 2-4 weeks before last frost, once soil reaches 45°F; frost-tender shoots emerge after the danger has mostly passed.
Frost here: last around Apr 10 (Mar 27 to Apr 24 most years), first around Oct 25. Zone averages, your own yard may run a week or two either way.
Life stages
From the first start to harvest
Follow the growing sequence. Choose a stage to see its care and signs to watch for.
Stage 1 of 6 · The growing sequence
Sprouting & emergence
Day 0 to 21 from planting
Care at this stage
-
Water lightly, then wait for shoots
Seed pieces have their own energy store; keep soil barely moist, not wet - soggy cool soil rots pieces before they sprout.
-
Plant into 45°F+ soil
Pieces sit and sulk (and may rot) in cold ground; emergence takes 2-4 weeks and is faster in warmer soil.
Stages can overlap; weather, variety, and growing conditions change the pace.
Harvest
- New potatoes: plants are flowering and tubers are egg-sized
- Storage potatoes: tops have yellowed and died back
- Skins are set - they don't rub off under thumb pressure
- Steal new potatoes at flowering; dig the maincrop after die-back · weekly
- Cure 1-2 weeks in the dark before storing
Per plant 5 to 20 potatoes, 2 to 10 lbPicking pull once
Cook with potatoes
Watch out for
8 to know. 2 are high-risk: Colorado Potato Beetle, Late Blight. None are active in October.
Colorado Potato BeetleSeverity High PestSeason: May–AugYellow-orange egg clusters on leaf undersides, humpbacked reddish larvae feeding in groups, and skeletonized leaves from the top down.
If you grow potatoes and eggplant, expect this beetle; scouting from emergence and squashing eggs before larvae hatch prevents most damage.
Yellow-orange egg clusters on leaf undersides, humpbacked reddish larvae feeding in groups, and skeletonized leaves from the top down.
Hand-pick adults and crush egg masses daily - the single most effective home control; spinosad or Bt (tenebrionis strain) for heavy pressure. They develop resistance fast, so rotate any spray.
Rotate potatoes far from last year's bed (adults overwinter in soil and walk to the nearest nightshade); use straw mulch and row cover on young plants; interplant beans.
The signature potato pest: a rounded yellow-and-black-striped beetle whose humpbacked brick-red larvae can strip a plant's foliage in days, cutting yield hard.
Late BlightSeverity High DiseaseSeason: Jun–SepLarge greasy-looking dark patches on leaves and stems, white fuzz under leaves in humidity, and firm brown-to-purplish rot on tubers.
The disease that caused the Irish potato famine; it infects both potato and tomato, so keep them apart and never compost blighted plants.
Large greasy-looking dark patches on leaves and stems, white fuzz under leaves in humidity, and firm brown-to-purplish rot on tubers.
There is no cure - remove and bag whole infected plants immediately to protect neighbors, and cut down foliage before digging so spores don't reach the tubers. It spreads on wind for miles.
Plant certified clean seed and resistant varieties; give maximum airflow; keep foliage dry; destroy volunteer potatoes and cull piles that harbor it over winter.
The Irish-famine pathogen (Phytophthora): greasy gray-green lesions that can collapse a planting in under a week of cool, wet weather.
Flea BeetlesSeverity Medium PestSeason: Apr–JunDozens of pinhead-sized round holes peppered across the leaves, thickest on the youngest, most tender growth.
Mostly cosmetic on established potatoes, but they can check emerging plants and spread bacterial disease; protect new growth in spring.
Dozens of pinhead-sized round holes peppered across the leaves, thickest on the youngest, most tender growth. Tiny beetles that spring away as you brush the plants or lean in for a closer look - that jump is the identification. Seedlings that go lacy and stop growing, and transplants that sit and sulk instead of taking off. Damage heaviest in warm, dry weather and along the edge of a bed nearest weedy ground or last year's crop debris. On root crops, shallow narrow grooves or channels scarring the skin at harvest, from larvae feeding underground.
Row cover and healthy fast growth carry most crops through, and on an established plant the damage is usually cosmetic and needs nothing at all. Where a young planting is genuinely being stripped, kaolin clay coats the leaves and deters feeding, and spinosad will knock the beetles back. Spinosad is acutely toxic to bees while the spray is still wet - apply it at dusk when bees are not flying, never onto plants in flower, and follow the product label. Anything you spray must be labeled for the plant you are treating, and you must observe its pre-harvest interval on a crop you are picking. Yellow sticky traps are useful for telling you when the beetles have arrived. Where the damage falls on the part you eat, harvesting young often beats them outright; where you are growing for a root or a fruit, leaf damage can simply be tolerated. Larvae feeding underground cannot be reached by a foliar spray, so rotation and clean beds are what work against those.
Floating row cover or fine insect mesh, laid over the bed from the day of sowing or transplanting and sealed at the edges so nothing can walk in underneath, is the single best defense - and on the crops they favor it is close to essential. Leave it on until plants are large and growing strongly, or until flowering on anything that needs pollinating. Push growth: a well-watered, unchecked plant outgrows the damage, so the whole game is getting seedlings through their vulnerable weeks fast. Keep beds weed-free, since related weeds host the beetles alongside your crop, and clear crop debris at the end of the season where the adults overwinter. Rotate away from a bed that grew a related crop last year. Where you can, shift sowing dates - cooler-season and fall plantings often miss the peak of adult feeding entirely.
Flea beetles are tiny dark beetles - often shiny black or bronze, rarely more than a couple of millimeters long - with enlarged back legs that let them spring away like fleas the moment you lean in. The adults chew countless small round pits and shot-holes through leaves, giving the foliage a peppered, buckshot-riddled look. They overwinter as adults in leaf litter, hedgerows, and crop debris, emerge hungry in spring, and are worst in warm dry spells. The damage is mostly a seedling and transplant problem: a small plant with a few leaves can be checked, stunted, or killed outright, while the same plant shrugs them off once it is large and growing strongly. Different species specialize on different plant families, so the beetles hammering your brassicas are not the ones on your nightshades. Some species also have larvae that feed on roots and tubers underground.
WirewormSeverity Medium PestSeason: Apr–AugThin, clean holes and shallow tunnels in roots at harvest, and stiff orange-brown 'worms' in the soil - worst in beds recently converted from lawn or sod.
Damage is cosmetic tunneling rather than plant death, but heavy populations riddle a crop; new gardens broken from lawn are the classic hotspot.
Thin, clean holes and shallow tunnels in roots at harvest, and stiff orange-brown 'worms' in the soil - worst in beds recently converted from lawn or sod.
No rescue for holed tubers - trim and eat them soon (they don't store); trap with buried potato or carrot pieces before planting to gauge and reduce numbers.
Avoid planting potatoes into ground that was grass/sod the year before; rotate; cultivate the soil to expose larvae to birds; bait with buried potato chunks and remove them with their feeders.
The tough, wiry, orange-brown larvae of click beetles, which live in soil for years and bore narrow holes and tunnels through storage roots.
Common ScabSeverity Medium DiseaseSeason: Jun–AugBrown, corky, scabby patches or star-shaped pits on the potato skin at harvest; the flesh underneath is fine.
Cosmetic only: scabby potatoes are perfectly good to eat. The best prevention is consistent watering from flowering onward.
Brown, corky, scabby patches or star-shaped pits on the potato skin at harvest; the flesh underneath is fine.
No treatment once tubers are affected - they're still edible; peel and eat normally, and fix the soil moisture and pH for next year.
Keep soil evenly moist during tuber formation (the key control), don't lime the potato bed (keep pH 5.0-5.5), avoid fresh manure, and grow scab-resistant varieties.
A soil bacterium (Streptomyces) that produces rough, corky, raised or pitted lesions on tuber skins; cosmetic but unsightly, worst in dry, alkaline soils.
Early BlightSeverity Medium DiseaseSeason: Jun–SepBulls-eye-patterned brown spots on lower leaves, yellowing around the spots, and leaf drop moving upward; dark sunken spots on tubers.
Rarely fatal on its own but weakens the plant and shortens the bulking window; more of a slow drain than late blight's sudden collapse.
Bulls-eye-patterned brown spots on lower leaves, yellowing around the spots, and leaf drop moving upward; dark sunken spots on tubers.
Remove and trash (never compost) affected leaves at first sight; copper or biological fungicides slow the spread through the canopy.
Mulch to stop soil splash, water at the base, rotate out of nightshade beds for 2-3 years, and keep plants well-fed (stressed plants suffer worse).
Fungal disease (Alternaria) causing brown spots with concentric target rings, starting on the lowest leaves and climbing - the same nightshade disease that hits tomatoes and potatoes.
Verticillium WiltSeverity Medium DiseaseSeason: Jul–SepOne branch, one limb or one side of a plant wilting, yellowing and browning in summer while the rest carries on normally - the lopsided pattern is the tell - and leaves that wilt and then hang on rather than dropping cleanly.
Part of the 'early die' complex in potatoes, and it shows as brown streaking in the tuber's vascular ring as well as the stem. A bed that keeps killing potatoes weeks early is a sign to rotate hard away from all nightshades.
One branch, one limb or one side of a plant wilting, yellowing and browning in summer while the rest carries on normally - the lopsided pattern is the tell - and leaves that wilt and then hang on rather than dropping cleanly. Cut into affected wood and look for olive-green, grey or brown streaking along the grain; in a cut vegetable stem it shows as a ring of discolored dots. On vegetables, lower leaves yellow in a wedge from the margin inward, and the plant wilts at midday but recovers overnight in the early stages.
There is no cure and nothing to spray. On a tree or shrub the aim is to keep it alive long enough to compartmentalize the fungus, which many plants manage for years: prune out dead and wilting branches well below the discolored wood, sanitize the pruners between cuts, water deeply through dry spells, mulch, and feed lightly rather than pushing it with a heavy feed. On vegetables, pull and bin affected plants rather than composting them, and move that crop to clean ground or to containers of fresh mix. Do not replant the same species where one has died.
There is no way to sterilize garden soil of it, so prevention is plant choice and plant vigor. Do not replant a susceptible species where one has already died of it. Grasses, conifers, ginkgo, hawthorn, hornbeam, honeylocust, oak and beech do not get it, and many vegetable varieties carry bred-in resistance - the V in a VFN code on the seed packet. Rotate susceptible vegetables on a long cycle and keep them off ground where the disease has shown. Buy clean stock, avoid wounding roots with spades and machinery, and keep woody plants steadily watered, mulched and only lightly fed, because a vigorous plant walls the fungus off far better than a stressed one.
A soil fungus (Verticillium dahliae and relatives) that enters through the roots and grows upward inside the water-conducting tissue, plugging it from within. The plant is not being eaten or rotted, it is being cut off from its own water supply, which is why the signature symptom is one branch or one side wilting and browning while the rest looks perfectly healthy. Cut into affected wood or stem and the tissue is streaked olive-green, grey or brown. The host range is enormous - maples, redbud, olive, tomato, potato, pepper, eggplant, strawberry and many more - and the fungus survives in soil for years as tough resting structures, so infected ground stays infected. Grasses and conifers do not get it.
1 more, low risk
AphidsSeverity Low PestSeason: May–AugDense clusters of tiny insects packed onto shoot tips, flower buds, and the undersides of young leaves.
The real danger on potatoes isn't the feeding but the viruses aphids spread (leafroll, PVY) - which is another reason to plant clean certified seed and control aphids early.
Dense clusters of tiny insects packed onto shoot tips, flower buds, and the undersides of young leaves. Curled, cupped, or distorted new growth that never opens properly. A sticky shine on the leaves - and on whatever sits under the plant - that later goes black with sooty mold. Tiny white cast skins left behind where a colony has been feeding. Ants running steadily up and down the stems, which is often the first thing you notice. Mottled, streaked, or misshapen leaves that do not grow out can mean a virus the aphids brought with them rather than the feeding itself.
Knock the colonies off with a hard jet of water and repeat every few days - on most plants that alone ends it. Pinch out or prune off the worst-infested tips rather than treating the whole plant. If colonies keep rebuilding, spray insecticidal soap or horticultural oil directly onto the insects, covering leaf undersides, and repeat weekly until they are gone; treat early or late in the day, and never spray a wilted or heat-stressed plant. Avoid broad-spectrum insecticides - they kill the ladybugs, lacewings, and parasitic wasps that were about to solve the problem for you, and aphid numbers usually come back worse afterward. Anything you spray must be labeled for the plant you are treating; follow that label and observe its pre-harvest interval. On anything you eat, wash leaves, heads, and buds well before use, since aphids hide down in crowns, folds, and tight growth.
Go easy on nitrogen: the soft, lush growth that heavy feeding produces is exactly what aphids breed on. Check new growth once a week through spring and early summer so you catch colonies while they are still small, and rub the first few out with your fingers. Leave flowering plants nearby and skip broad-spectrum sprays - ladybugs, lacewings, hoverflies, and parasitic wasps do most of this work for free, and they only stay if there is something for them to eat. Keep ants off the plant where you can, since they protect aphids from those predators. Water steadily so plants are not stressed, and check any new plant over before you bring it home or move it indoors, since aphids usually arrive on something else.
Aphids are small soft-bodied sap-suckers - green, black, gray, pink, or waxy white, and mostly wingless - that gather in dense colonies on the tenderest new growth: shoot tips, buds, and the undersides of young leaves. They breed extremely fast in mild weather, so a few can become hundreds inside a week. Their feeding curls and distorts soft growth, and the sticky honeydew they excrete coats everything below and turns black with sooty mold. Ants often farm and defend the colonies for that honeydew. A few aphids are normal on almost any plant and a healthy plant shrugs them off; only dense, persistent colonies do real damage, and some aphids also spread plant viruses as they feed.
Good & bad neighbors
First rule: keep Tomato apart. Same family, same diseases: early and late blight move freely between them.
Plant nearby
-
Legumes fix nitrogen for the heavy-feeding potato, and beans are traditionally credited with repelling Colorado potato beetle - a genuinely useful interplant.
-
French marigolds suppress root-knot nematodes in the soil; broader pest-repellent claims are softer.
- Traditional pairings, thin evidence
-
Traditional field pairing; the tall corn and low potato use different layers without much conflict.
-
HorseradishFolk practice plants horseradish at the corners of the potato patch to improve vigor and deter beetles; anecdotal but harmless.

Keep apart
-
Same family, same diseases: early and late blight move freely between them. Keep them well apart and never rotate one onto the other's ground.
-
Another nightshade sharing verticillium wilt, blights, and Colorado potato beetle - don't group them or follow one with the other.
-
Shares nightshade diseases and pests; separate the beds and rotate.
-
Sunflowers are allelopathic and heavy competitors; potatoes reportedly grow poorly in their shadow and root zone.


Varieties · 18
You pick one when you add Potato to your garden. Its days to maturity set your harvest window.
Early / new potato 4 varieties
Yukon Gold
The gold standard all-purpose potato and the variety that made yellow-fleshed potatoes mainstream in North America: thin gold skin, creamy yellow flesh with a buttery flavor, and a texture between waxy and starchy that mashes, roasts, and boils equally well.
Variety details for Yukon Gold
Round-to-oval tubers with smooth golden skin, shallow pink eyes, and yellow flesh.
early-midall-purposeyellow-fleshResists Scab
Norland (Red Norland)
An early red-skinned variety among the first potatoes ready each season, with smooth skin and good common-scab resistance.
Variety details for Norland (Red Norland)
Oblong tubers with smooth red skin, shallow eyes, and white flesh.
red-skinnew-potatoResists Scab
Excellent as tender new potatoes; boils and steams well. Sold as both Norland and Red Norland - the same variety, Red Norland being the red-skinned selection nearly every seed catalogue now ships. It is not blight-resistant, so lift it early in a wet season.
Midseason 10 varieties
Kennebec
A dependable, heavy-yielding maincrop with real late-blight tolerance - a favorite of home growers and the classic frying potato.
Variety details for Kennebec
Large, oblong tubers with thin light-tan skin, shallow eyes, and white flesh.
mid-latestarchyhigh-yieldResists Late Blight, Potato Virus A
Large, smooth tan tubers with white flesh that keep well through winter.
Red Pontiac
A vigorous, widely adaptable red potato that tolerates heavy soils and warm climates better than most, making it a Southern favorite.
Variety details for Red Pontiac
Round, deep-red tubers with shallow eyes and white, moist flesh.
maincropred-skinheat-tolerantResists Scab
Smooth red skin over moist white flesh; good boiled, mashed, or dug young as red new potatoes.
Late / storage 3 varieties
Russet Burbank
The iconic American baking-and-frying potato (and the original McDonald's fry), bred by Luther Burbank in the 1870s: big, high-starch tubers with netted brown skin that bake fluffy and fry crisp.
Variety details for Russet Burbank
Long, cylindrical tubers with rough russeted brown skin and dry white flesh.
starchystoragebakingResists Scab
Needs a long season and even water; susceptible to late blight.
All Blue
A heirloom blue potato (also sold as Purple Marker) with deep blue skin and blue-purple flesh rich in anthocyanins.
Variety details for All Blue
Deep-blue skin over blue-purple flesh that stays colored when cooked.
blue-fleshheirloomantioxidantSlightly dry and versatile; may be susceptible to blight, so grow it where the season allows.
Fingerling 1 variety
Fingerling
Not one variety but a class of small, finger-shaped waxy heirlooms (Russian Banana, French Fingerling, Rose Finn Apple) with dense, buttery flesh.
Variety details for Fingerling
Small, elongated finger-shaped tubers in yellow, red, or purple with firm waxy flesh.
latewaxygourmetheirloomRoast whole or halve for salads; the gourmet potato most worth growing at home.
Grower tips
Notes from growers, tagged with the zone they grow in. A person reads every post before it appears.
Nobody has posted about Potato yet. The first one usually saves someone a season.
Free account. Your post shows your grower name and zone, never your email.