Add it to your home screen and it opens full screen: no browser bars, one tap away, and everything stays signed in. Free, nothing to download from an app store.
- Tap the Share button in your browser
- Scroll down and choose “Add to Home Screen”
- Open GrowSomeFood from your home screen
- Open your browser’s menu
- Choose “Add to Home screen” or “Install app”
- Open GrowSomeFood from your home screen
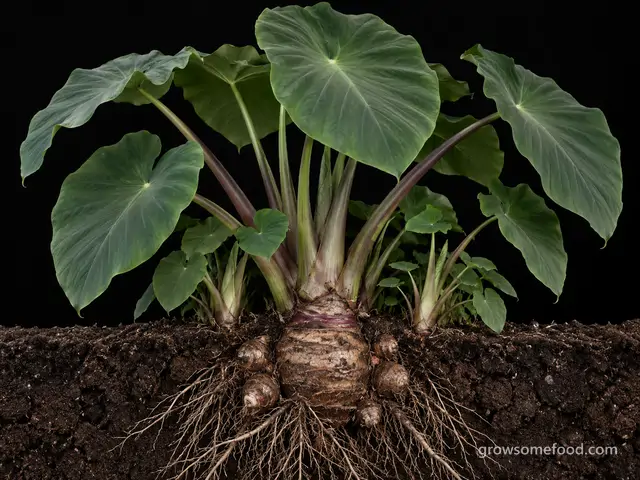
Taro
One of the oldest food plants on earth - a huge-leaved tropical grown for its starchy corm and its cooked greens. Nothing on it is edible raw, and it is a prohibited plant in Florida.
NEVER eat any part raw. Every part carries needle-sharp calcium-oxalate raphides that burn and swell the lips, mouth and throat - raw corm and raw leaves are genuinely dangerous, not just unpleasant. Thorough cooking destroys them: boil, steam or bake corms until fully tender (20+ minutes) and simmer leaves until soft, discarding the water. Wear gloves to peel; the raw sap itches. Colocasia esculenta is a PROHIBITED aquatic plant in Florida - do not plant it there.
Overview
The one thing to knowIn Hawaii it is kalo, the ancestral plant at the center of Hawaiian culture and identity.
Taro is among the oldest cultivated food plants on earth: a bold tropical perennial grown for the dense, starchy corm it swells at its base and for its heart-shaped leaves, both staples across the Pacific, Asia, Africa and the Caribbean. In Hawaii it is kalo, the ancestral plant at the center of Hawaiian culture and identity. In the Caribbean and the American South the large-cormed types are sold as dasheen; in Japanese and Chinese kitchens the small clustering types are sato-imo and eddoes. The corm tastes nutty and faintly sweet with a smooth, dense texture, and the plant itself is spectacular - three to six feet of leaves that will happily stand in water.
Two things have to be said before anything else. First, no part of taro is edible raw. Every part is packed with needle-fine calcium-oxalate crystals that burn the mouth and throat; thorough cooking is what turns this plant into food, and it is not optional. Second, taro is a prohibited aquatic plant in Florida and a serious invader of creeks, ditches and spring runs across the Gulf South, so where you plant it and how you contain it matter as much as how you grow it.
Quick facts
- Life cycle
- Perennial, grown as an annual
- Height
- 54 in30 to 84
- Spread
- 40 in24 to 60
- Cold
- Killed by frostdamaged below 32°F
- Heat
- Struggles above 100°F
Full sun or part sun or part shade · high water · tolerates wet soil soil · 30 in apart (18 to 42) · transplant or division or tubers
When to plant
Nothing is open today. Spring indoor sowing opens 5 months, Feb 13 to Mar 13.
- Start indoors Feb 13 – Mar 13 Opens in 145 daysAbout 8 weeks before to 4 weeks before your last frost (Apr 10 here)Too short a season for a field crop. Sprout corms indoors in warmth, move tubs out after frost, and treat it as a magnificent container plant that yields a modest crop; lift the corms and overwinter them frost-free indoors.
Frost here: last around Apr 10 (Mar 27 to Apr 24 most years), first around Oct 25. Zone averages, your own yard may run a week or two either way.
Life stages
Four stages, about 8 months from sowing to the first pull. Windows are typical; your zone and weather move them.
Sprouting
Day 0 to 40 from sowing- WaterKeep the bed saturated from the day you plantevery 2 daysTaro will not tolerate drying out at any stage. Wetland types are happiest with an inch or two of standing water over the bed; upland types want soil that never goes past damp. In a tub, keep the water level at or just above the soil surface.
- ProtectPlant only into warm soil (70°F+)Corms sit and rot in cool ground. Wait until soil is genuinely warm - two to four weeks after last frost in most of the country - and until nights stay above 60°F. In short-season gardens, start corms in pots indoors 4-6 weeks early instead of waiting.
- FertilizeWork compost and a balanced feed into the bed firstTaro is a heavy feeder that will be in the ground for most of a year. Dig in plenty of compost or aged manure before planting, plus a balanced fertilizer; lean soil is the single most common reason a home taro crop makes marbles instead of corms.
Watch for- Corms that stay silent past six weeks (soil too cold, or the corm was already rotten)
- Soft, foul-smelling corms just under the surface (corm rot)
- Weeds getting ahead while the plant is small
Leaf canopy
Day 45 to 200 from sowing- WaterNever let it dry out - this is the whole jobevery 2 daysWater stress is what separates a fist-sized corm from a football. Keep wetland taro flooded or permanently saturated and upland taro evenly moist; a taro that wilts has already lost yield. In heat, a bed can need water daily.
- FertilizeSide-dress every 4-6 weeks through the growing seasonA long season and huge leaves mean a long appetite. Side-dress with compost or a balanced fertilizer roughly monthly until about six weeks before you plan to dig, then stop and let the corm firm up.
- MulchMulch upland plantings heavilyOn dry-land taro a thick mulch is what keeps the soil from swinging between soaked and baked, and it suppresses the weeds that a young taro cannot outrun. Flooded beds need none.
- ThinRemove side suckers if you want one big cormTaro throws offshoots around the mother plant all season. Leave them and you get a clump of small corms; pull or cut them off through midsummer and the plant puts everything into one large central corm. Either is a valid crop - decide early. The suckers you remove are the next season's planting stock.
- InspectCheck leaves weekly for blight in humid weatherweeklyTaro leaf blight begins as small water-soaked spots that spread into large brown patches with a yellow halo, sometimes with a white fuzzy margin at dawn. It moves fast in warm, wet, still air - catching it early and cutting off affected leaves is the only cheap control.
Watch for- Wilting or edge-scorch on the biggest leaves (not enough water)
- Water-soaked spots spreading into large brown blotches (leaf blight)
- Pale, feathery yellow streaking or distortion in new leaves (dasheen mosaic virus)
- Aphid colonies packed under the youngest leaves
Corm bulking
Day 165 to 280 from sowing- WaterHold moisture steady while the corm sizes upevery 3 daysThe corm does most of its swelling in the last third of the season. Keep water constant now; a dry spell at this stage is the difference between a heavy corm and a stringy one.
- MulchHill soil or mulch over any corm shouldering out of the groundevery 3 weeksA bulking corm pushes upward and its shoulders green up and toughen in the sun. Draw soil or mulch over exposed shoulders every few weeks - it keeps the corm tender and protects it from sunscald.
- HarvestStart picking young leaves for greensevery 2 weeksTake a few of the youngest, tenderest unfurled leaves per plant - never so many that you strip the canopy, since leaves are what build the corm. Cook them long and thoroughly; taro leaf is not a salad green under any circumstances.
Watch for- Corm shoulders greening above the soil line
- Older outer leaves yellowing and dying back (normal as the plant matures)
- Sudden collapse of a whole plant (corm rot)
Harvest
Day 180 to 330 to the first pull from sowing- HarvestDig the whole plant when the leaves yellow and shrinkTaro tells you it is finished: the leaves stop making new growth, go yellow, and the newest ones come out noticeably smaller. Drain a flooded bed for a few days first, then lift the whole clump with a fork well outside the crown. In frost country, dig before the first frost regardless of what the leaves are doing.
- DoCut and save the huli for next seasonBefore the corm goes to the kitchen, slice off the top half-inch to inch of the corm with 6-12 inches of leaf stalk still attached. That piece - the huli - is your planting stock: replant it immediately in the tropics, or pot it up and hold it frost-free over winter.
- ProtectWear gloves to lift, wash and peelThe raw sap and the skin of a fresh corm make many people itch, and a few react strongly. Gloves for digging, washing and peeling solve it entirely. Peeling a corm under running water also helps.
Watch for- Frost blackening the leaves (dig immediately - freeze damage rots into the corm)
- Fork wounds on the corm (they rot first in storage)
- Itchy hands and forearms after handling (wear gloves)
Harvest
- Leaves yellowing and dying back, with each new leaf smaller than the last
- Seven to eleven months from planting, depending on type - eddoes finish first
- Corm shoulders visibly pushing up out of the soil
- Before the first frost, whatever the plant looks like
- Dig the whole plant when the leaves yellow and shrink
- Cut and save the huli for next season
- Wear gloves to lift, wash and peel
Per plant 1 to 12 corms, 1 to 10 lbPicking pull onceFirst crop 1 yrs
Cook with Taro
Watch out for
5 to know. 2 are high-risk: Raphide Burn from Raw or Undercooked Taro, Taro Leaf Blight. 5 are active in September.
Raphide Burn from Raw or Undercooked TaroSeverity High DisordernowCultivars differ enormously in acridity - eddoe and Japanese sato-imo types are generally mildest, some wild and ornamental Colocasia are ferocious.
If a fully cooked mouthful still prickles, that batch needed longer in the pot, not a bigger bite.
Immediate burning, prickling or scratchiness in the mouth and throat during or just after eating, heavy drooling, a hoarse or changed voice, difficulty swallowing, visible swelling of the lips or tongue, and any trouble breathing. On the skin, intense itching and prickling on the hands and forearms hours after peeling or digging.
For a scratchy mouth after a cooked meal, stop eating that batch and cook it longer - the food is underdone. For a genuine raw exposure, call poison control or emergency services immediately rather than waiting for symptoms to peak. Rinse the mouth with cool water; cold milk, ice or ice cream soothes the tissue. Do not induce vomiting. Any airway symptom - drooling, a changed voice, trouble swallowing or breathing - is an emergency call. For skin contact, wash with soap and water; the itching fades over hours and a cool compress helps.
Cook every part, every time - boil, steam or bake corms until completely tender (20 minutes minimum, longer for large pieces) and simmer leaves for around 45 minutes in an uncovered pot, discarding the cooking water. Never taste raw taro to identify it or to check a variety. Buy food-grade planting and eating stock: ornamental elephant ears sold for foliage, and anything sold as Alocasia, are not food. Wear gloves to dig, wash and peel, or peel under running water, and rinse arms afterward.
Every part of taro - corm, cormels, leaves, stalks and sap - carries bundled needles of calcium oxalate that fire into soft tissue on chewing, causing burning, blistering and swelling of the lips, mouth, tongue and throat. Severe swelling can compromise the airway. Thorough cooking destroys them, which is why taro has been eaten safely by billions of people for thousands of years; the harm comes from eating it raw, from cutting cooking short, and from treating taro leaf like spinach. Handling the raw plant also causes an itching, prickling contact dermatitis on the hands and forearms.
Taro Leaf BlightSeverity High DiseasenowEstablished in Hawaii and a constant management concern there; mainland gardens see it mainly in wet Gulf Coast summers.
The corm stays edible - blight is a yield problem, not a food-safety one.
Small dark water-soaked spots appearing on the leaf blade, often near the edge or where water sits. Spots expanding into large brown or purplish blotches with a yellow halo and, at dawn, a fine white fringe of sporulation at the margin. Yellow droplets of fluid on the lesions. Whole leaves collapsing and rotting away within days in wet weather, with the plant pushing out replacements that are smaller each time. Damage worst in crowded, still, humid plantings and after long wet spells.
There is no cure for an infected leaf. Cut off and destroy affected foliage promptly - do not compost it - and open the planting up so air moves through. Copper fungicides labeled for the crop give some protection on healthy tissue in wet seasons, but they must go on before infection and be reapplied; follow the label and observe its pre-harvest interval. If a planting is overwhelmed, harvest what corm there is, destroy the tops, and start the next season with clean stock in a different bed.
Start with clean planting material - the disease travels on huli and corms, so never take stock from a blighted patch. Space plants for real airflow rather than packing them, site the bed where morning sun dries the leaves, and water at the base rather than over the canopy. Remove and destroy infected leaves as they appear instead of leaving them to sporulate, and clear all crop debris at the end of the season. Where blight is established, resistant cultivars developed in Hawaii, Samoa and the Pacific breeding programs are the only durable answer.
A water mold (Phytophthora colocasiae) that is the most damaging taro disease worldwide - it destroyed most of Samoa's taro crop in the 1990s and is established in Hawaii. It begins as small dark water-soaked spots on the leaf blade, which expand into large brown-to-purple blotches ringed with yellow, often with a fine white fuzzy margin visible in the early morning. Leaves are destroyed from the outside in, and a plant that cannot hold a canopy cannot fill a corm, so severe blight cuts yields drastically even though the corm itself is not directly attacked. It moves fastest in warm, wet, humid, still conditions and is spread by rain splash and on planting material.
AphidsSeverity Medium PestnowThe feeding itself barely troubles a big taro plant - the reason to care is dasheen mosaic virus, which aphids move from plant to plant and which then rides in the corms and huli you save.
Streaked, feathery, distorted new leaves mean the virus; remove that plant and never propagate from it.
Dense clusters of tiny insects packed onto shoot tips, flower buds, and the undersides of young leaves. Curled, cupped, or distorted new growth that never opens properly. A sticky shine on the leaves - and on whatever sits under the plant - that later goes black with sooty mold. Tiny white cast skins left behind where a colony has been feeding. Ants running steadily up and down the stems, which is often the first thing you notice. Mottled, streaked, or misshapen leaves that do not grow out can mean a virus the aphids brought with them rather than the feeding itself.
Knock the colonies off with a hard jet of water and repeat every few days - on most plants that alone ends it. Pinch out or prune off the worst-infested tips rather than treating the whole plant. If colonies keep rebuilding, spray insecticidal soap or horticultural oil directly onto the insects, covering leaf undersides, and repeat weekly until they are gone; treat early or late in the day, and never spray a wilted or heat-stressed plant. Avoid broad-spectrum insecticides - they kill the ladybugs, lacewings, and parasitic wasps that were about to solve the problem for you, and aphid numbers usually come back worse afterward. Anything you spray must be labeled for the plant you are treating; follow that label and observe its pre-harvest interval. On anything you eat, wash leaves, heads, and buds well before use, since aphids hide down in crowns, folds, and tight growth.
Go easy on nitrogen: the soft, lush growth that heavy feeding produces is exactly what aphids breed on. Check new growth once a week through spring and early summer so you catch colonies while they are still small, and rub the first few out with your fingers. Leave flowering plants nearby and skip broad-spectrum sprays - ladybugs, lacewings, hoverflies, and parasitic wasps do most of this work for free, and they only stay if there is something for them to eat. Keep ants off the plant where you can, since they protect aphids from those predators. Water steadily so plants are not stressed, and check any new plant over before you bring it home or move it indoors, since aphids usually arrive on something else.
Aphids are small soft-bodied sap-suckers - green, black, gray, pink, or waxy white, and mostly wingless - that gather in dense colonies on the tenderest new growth: shoot tips, buds, and the undersides of young leaves. They breed extremely fast in mild weather, so a few can become hundreds inside a week. Their feeding curls and distorts soft growth, and the sticky honeydew they excrete coats everything below and turns black with sooty mold. Ants often farm and defend the colonies for that honeydew. A few aphids are normal on almost any plant and a healthy plant shrugs them off; only dense, persistent colonies do real damage, and some aphids also spread plant viruses as they feed.
Taro Corm RotSeverity Medium DiseasenowThe commonest way a mainland taro crop is lost in a tub or barrel, where the water goes stagnant and warm in midsummer.
Top the tub up with fresh water rather than letting it sit and evaporate.
A plant that stops growing, yellows, and then collapses at the crown while its neighbors look fine. A sour or fermented smell at the base. Soft, dark, water-soaked patches on a lifted corm, sometimes with firm tissue right beside them. Corms that feel light for their size. Rot spreading in storage from a single wounded corm to those touching it.
There is no rescue for a rotted corm. Pull affected plants with the surrounding soil, bin them rather than composting, and improve water movement or drainage before replanting. Cut well back into firm, sound, sweet-smelling flesh if you are salvaging part of a corm for the kitchen, and discard anything soft, discolored or sour-smelling entirely - do not trim around a rot and cook the rest.
Keep water moving or refresh it rather than letting a flooded bed go stagnant and hot, and on upland plantings make sure the ground drains even though it stays moist. Plant only firm, sound, disease-free corms and huli. Handle the crop gently at digging - every fork wound is an entry point - and cull damaged corms out of the storage batch rather than hoping. Rotate the bed rather than growing taro in the same ground year after year.
A complex of soil water molds and fungi (chiefly Pythium species) that rot the corm from the inside, turning firm white flesh into soft, sour, discolored mush. It is a disease of stagnation and injury rather than of wetness as such - taro is perfectly happy standing in moving or regularly refreshed water, but sits vulnerable in dead, airless, warm water or in heavy waterlogged soil. Wounds from digging, from cultivating too close, or from insect feeding are the usual doorway, and infected planting corms carry it into a clean bed.
Spider MitesSeverity Low PestnowAlmost never a problem on a properly watered taro, which is exactly the point - mites on taro are a symptom that the plant has been allowed to dry out.
They are far more common on tub-grown and overwintered indoor plants than in a wet bed.
Fine pale stippling or speckling across the upper leaf surface, as though the color had been sandblasted out of it, and later a dull bronze or rusty cast over the whole leaf. Delicate webbing across leaf joints, shoot tips, and undersides - that comes with a heavy infestation and means you caught it late. Leaves that dry, curl, and drop early while the plant looks thirsty no matter how much you water it. Hold a leaf over a sheet of white paper and tap it: the specks that fall and then start walking are mites. With a hand lens, look on the undersides for the mites themselves, pale or reddish, and their round translucent eggs. Damage that shows up first on the hottest, dustiest, most sheltered side of a plant, or on a pot sitting near a radiator indoors.
Start with water. A strong jet aimed at the leaf undersides, repeated every few days for a couple of weeks, knocks populations down and breaks the cycle - on many plants that alone ends it. On anything that regrows quickly, shearing back badly infested growth resets the plant to clean foliage. If it keeps building, spray insecticidal soap or horticultural oil directly onto the undersides where the mites actually live, and repeat every five to seven days for three rounds: contact sprays do not kill the eggs, so a single application always fails. Anything you spray must be labeled for the plant you are treating - follow the label and observe its pre-harvest interval on anything you eat. Predatory mites are an effective release in a greenhouse or on an indoor plant. Above all, correct the heat, dust, and drought stress that caused it, or the mites simply come back.
Do not let plants get drought-stressed - that is the single strongest trigger, and a plant watered steadily through heat is far less likely to have a mite problem at all. Hose the foliage down, undersides included, during hot dry spells: it knocks mites off, washes away the dust they thrive in, and raises the humidity around the plant for a while. Indoors and under cover, keep the air from going hot, dry, and stagnant, wipe or rinse the leaves occasionally, and keep pots away from radiators and heating vents. Inspect any plant carefully before you bring it indoors for winter or set it among others, since mites almost always arrive on something else. Avoid broad-spectrum insecticides: they wipe out the predatory mites, lacewings, and lady beetles that do most of this work for you, and reliably leave you with a worse outbreak than you started with.
Spider mites are not insects but tiny sap-feeding arachnids, smaller than a grain of salt, and you almost always notice the damage before you notice them. They live on the undersides of leaves and drain the cells one at a time, which is why the leaf goes finely stippled with pale dots before it bronzes and dries. They breed explosively in hot, dry, dusty, still air - a generation can pass in a week at high temperature - so a barely visible population becomes a webbed, bronzed plant within a fortnight. Drought-stressed plants and plants wintered indoors in dry heated air are the classic hosts. Broad-spectrum insecticides make matters worse rather than better, because they kill the predatory mites and lady beetles that normally hold mites in check.
Good & bad neighbors
Plant nearby
-
The traditional tropical pairing: bananas want the same heat, rich soil and heavy water, and their high canopy gives taro the light shade it tolerates well in fierce summer sun.
- Traditional pairings, thin evidence
-
Shares taro's long warm season, rich soil and dislike of drying out, and occupies the lower shaded layer without competing for the same root space.
-
Another long-season tropical rhizome with the same moisture and feeding needs - the two are commonly grown side by side in home gardens across the tropics.
-
Both are flooded-culture crops, so taro is often grown on the bunds and margins of paddies where the water is already managed. A pairing of shared infrastructure more than of biology.

Keep apart
-
Nothing that needs sharp drainage belongs in a taro bed. Mediterranean herbs rot in the permanently saturated soil taro requires - a straightforward incompatibility of water needs, not of chemistry.
Varieties · 7
You pick one when you add Taro to your garden. Its days to maturity set your harvest window.
Dasheen (large-corm wetland taro) 2 varieties
Bun Long
Large brown fibrous corm with dry white flesh threaded with purple fibers.
wetlandlarge-cormfryingThe Chinese taro grown commercially for taro chips and for the slices in dim sum and taro cakes: a big single corm, sometimes several pounds, with dry, firm white flesh flecked purple. It fries better than any other type and holds shape in braises. Needs a long, hot, wet season, so it belongs in zones 9 and warmer.
Trinidad Dasheen
Large rough brown corm with pale grey-lavender flesh that softens when boiled.
wetlandlarge-cormcaribbeanThe broad Caribbean dasheen group, and the taro most often found in Gulf Coast produce markets and Caribbean groceries. A large central corm with soft, faintly grey-lavender flesh that cooks creamy - the type used in pepperpot, callaloo soup and boiled ground provisions. The leaves are the classic callaloo green.
Eddoe (clustering upland taro) 2 varieties
Sato-imo
Egg-sized cormels with banded hairy brown skin and firm white flesh.
uplandshort-seasonsilky-textureThe Japanese clustering taro - small hairy cormels around a modest central corm, with white flesh that turns notably silky and slightly sticky when simmered. Grown on dry land rather than flooded, finishes in about seven months, and is among the mildest types, which makes it the sensible starting point for a mainland gardener.
Coco (West Indian eddoe)
Clusters of small brown hairy cormels with dense white flesh.
uplandshort-seasoncaribbeanThe small Caribbean eddoe, sold as coco or eddo, that makes a generous cluster of firm cormels around a small mother corm. Boiled whole in soups and stews or served as a ground provision, it keeps better than any of the big dasheen types and tolerates ordinary upland soil, so it is the practical choice where the season is short.
Hawaiian kalo (poi types) 3 varieties
Lehua Maoli
Dense corm with pink-flecked flesh; reddish leaf stalks.
kalowetlandpoiheirloomOne of the best-known Hawaiian poi cultivars and a mainstay of lo'i kalo farming, named for the deep red of the lehua blossom that its stalks and corm flesh echo. Grown in flooded terraces over roughly a year and steamed and pounded into a pink-toned poi. Planting stock generally moves through Hawaiian community farms and cultural practitioners rather than the nursery trade.
Maui Lehua
Large firm corm with purple-pink flecked flesh.
kalowetlandpoivigorousA vigorous, widely grown Hawaiian poi cultivar selected for productivity in wetland lo'i, and one of the varieties that carries much of Hawaii's commercial poi production. Long-season and water-hungry, with the pink-purple flecked flesh that gives poi its characteristic color.
Moi
Smooth pale corm with lightly flecked flesh that pounds to a fine poi.
kalowetlandpoiheirloomA traditional Hawaiian kalo whose name marks it as a chiefly variety, valued for a notably smooth, fine poi. Like the other named kalo, it is a long-season wetland plant maintained clonally, and it is best understood as a cultural taonga in living cultivation rather than a garden-center variety.
Grower tips
Notes from growers, tagged with the zone they grow in. A person reads every post before it appears.
Nobody has posted about Taro yet. The first one usually saves someone a season.
Free account. Your post shows your grower name and zone, never your email.