
Add it to your home screen and it opens full screen: no browser bars, one tap away, and everything stays signed in. Free, nothing to download from an app store.
- Tap the Share button in your browser
- Scroll down and choose “Add to Home Screen”
- Open GrowSomeFood from your home screen
- Open your browser’s menu
- Choose “Add to Home screen” or “Install app”
- Open GrowSomeFood from your home screen

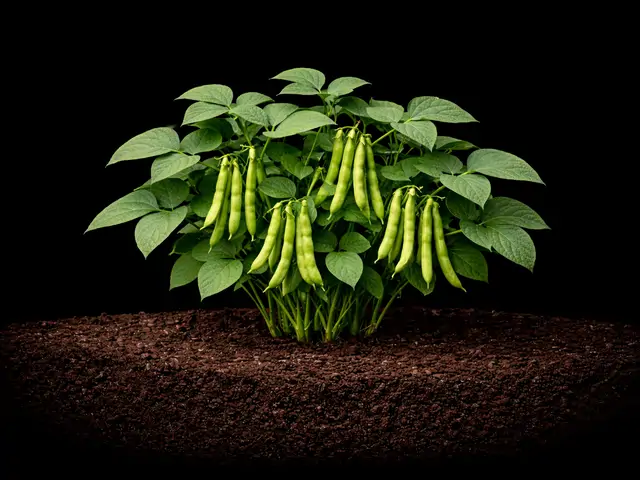
Snap Bean
The beginner's dependable crop: sow after frost, pick tender pods in two months, and sow again - bush beans crop fast and feed the soil.
Safety notes Young snap pods are eaten cooked or raw. But the mature dry seeds contain phytohaemagglutinin, a lectin that causes severe nausea, vomiting and diarrhea within hours if eaten raw or undercooked - any pods you let go to dry seed must be boiled hard for at least 10 minutes before eating.
Overview
Snap beans are the crop that makes a new gardener feel successful. Sow the fat seeds straight into warm soil, and in about eight weeks you're picking crisp, tender pods by the handful. As bush beans, they grow into a self-supporting knee-high plant - no trellis, no fuss - and set their crop in a concentrated two-week burst, which is exactly why you sow a fresh short row every couple of weeks for a steady supply all summer.
Quick facts
- Sprouts in
- 8 daysRange: 6–14 days
- Soil temperature
- 75 °FRange: 60–90 °F
- Height
- 20 inRange: 16–24 in
- Spread
- 12 inRange: 8–18 in
- Cold
- Killed by frostdamaged below 33°F
- Heat
- Struggles above 95°F
- Life cycle
- Annual
- Save seeds
- About 95 days after plantingRange: 85–110 days
- Soil
- Well-drained
- Water
- Medium
- Plant spacing
- 3 inRange: 2–4 in
When to plant
Nothing is open today. Spring sowing opens 6 months, Apr 10 to May 8.
- Direct sow Apr 10 – May 8 Opens in 173 daysAbout at to 4 weeks after your last frost (Apr 10 here)Wait for 60°F soil after the last frost; sow a fresh short row every 2 weeks for a continuous supply.
- Direct sow Aug 1 – Aug 31 Opens in 286 daysAbout 12 weeks before to 8 weeks before your first frost (Oct 25 here)Fall beans: sow 8-12 weeks before first frost for a clean late crop with fewer beetles.
- Direct sow Aug 11 – Aug 31 Opens in 296 daysAbout 11 weeks before to 8 weeks before your first frost (Oct 25 here)Last sowing about 8-11 weeks before first frost for a fall crop.
Frost here: last around Apr 10 (Mar 27 to Apr 24 most years), first around Oct 25. Zone averages, your own yard may run a week or two either way.
Life stages
From the first start to harvest
Follow the growing sequence. Choose a stage to see its care and signs to watch for.
Stage 1 of 6 · The growing sequence
Germination
Day 0 to 8 from sowing
Care at this stage
-
Keep soil evenly moist, never soggy
Beans rot in cold, wet soil. Wait for 60°F soil, water in at sowing, then keep just moist until sprouts break through.
-
Don't sow until the soil is warm
Below 60°F seeds sit and rot; at 75°F they're up in under a week. Patience beats an early replant.
Stages can overlap; weather, variety, and growing conditions change the pace.
Harvest
- Pods firm, crisp, and about pencil-thick
- Pods snap cleanly in half with a crisp break
- Seeds inside still small - before the pod gets lumpy
- Pick every 2-3 days at pencil size
- Sow the next succession
Per plant 20 to 70 pods, 4 to 16 ozPicking pick as they ripen
Cook with Snap Bean
Watch out for
6 to know. 1 is high-risk: Mexican Bean Beetle. None are active in October.
Mexican Bean BeetleSeverity High PestSeason: Jun–AugFuzzy spiny yellow larvae and neat clusters of yellow eggs on the leaf undersides, lacy skeletonized leaves with only the veins left, and coppery black-spotted adults on the foliage.
The number-one bean pest across much of the country. Concentrated feeding during pod set does the most damage, so scout leaf undersides every day or two while pods are filling.
Fuzzy spiny yellow larvae and neat clusters of yellow eggs on the leaf undersides, lacy skeletonized leaves with only the veins left, and coppery black-spotted adults on the foliage. The larvae are usually well established underneath before the adults become obvious, so turn the leaves over.
Hand-crush eggs and larvae on the leaf undersides - done every day or two while the pods are filling, this alone controls a home planting. Insecticidal soap or neem knocks back a heavy larval outbreak, and the parasitic wasp Pediobius is available for large plantings. Do not spray anything onto open flowers.
Float row cover over young plants, scout leaf undersides weekly from midsummer and crush the egg clusters before they hatch, grow early varieties that finish before peak beetle season where you can, clean up bean-family debris in fall, and rotate the bean bed.
A coppery, black-spotted beetle that looks like an oversized ladybug and is in fact a member of the same family - but this one eats plants. The spiny yellow larvae do most of the damage, feeding on the undersides of bean-family leaves and skeletonizing them into lace, which cuts the photosynthesis that fills the pods. Both adults and larvae feed, and over a long season the generations stack up.
Root RotSeverity Medium DiseaseSeason: Apr–JunWilting in the middle of the day on a plant whose soil is damp - the classic tell, and the reason people water a rotting plant and finish it off.
Cold, wet soil at sowing is the whole risk. Sow into warm soil (60F and up), do not overwater, rotate legumes, and avoid working wet ground; resow into warmer soil if a stand fails.
Wilting in the middle of the day on a plant whose soil is damp - the classic tell, and the reason people water a rotting plant and finish it off. Leaves yellowing from the bottom up, dull off-color foliage, and growth that stalls for no visible reason. Whole shoots, or one side of the plant, collapsing while the rest still looks fine. Soft, dark, or mushy tissue at the base of the stem or at the crown, sometimes with a sour smell. Lift a failing plant and look at the roots: healthy ones are firm and pale, rotted ones are brown or black and slimy, and the outer layer slips off between your fingers leaving a thread of core behind. Seedlings that topple over at soil level are the same problem, called damping-off.
There is no cure for tissue that has already rotted, so act on the conditions rather than looking for a spray. Stop watering at once and fix the drainage - open up compacted soil, or move the plant to a raised, sharply drained position or a container. Lift a badly affected plant, cut away every soft dark root and rotted section with a clean blade back to firm pale tissue, and replant only the healthy parts into fresh free-draining soil or mix. Often the better move is to give up on the plant and save its offspring instead: cuttings, offsets, or divisions taken from firm healthy growth root readily and give you a clean start. Bin the rotted material rather than composting it, and correct the drainage before you replant, because the rot comes straight back in the same wet spot.
Drainage is the whole defense. Match the plant to the site first - something that wants sharp drainage will not survive heavy clay or a low, water-collecting spot however well you tend it. Where the ground is heavy, plant on a raised bed, berm, or slope, or grow in a container. Set plants at the depth they were already growing, since burying the crown or the root flare is a common cause of rot, and keep mulch pulled back a few inches from the stem base instead of piled against it. Water the soil rather than the calendar: check that the top inch or two is dry before watering again, cut back hard in cool weather and winter dormancy, and never leave a pot standing in a full saucer. Do not plant or dig in soggy ground, and go easy on rich amendments for plants that want it lean. Rotate annual crops, and start with clean healthy plants and fresh mix.
Root rot is not one organism but a group of soil fungi and water molds - Pythium, Phytophthora, Fusarium, Rhizoctonia and others - that sit harmlessly in most soils and only turn destructive when the ground stays saturated. Waterlogged soil drives the air out, the roots suffocate, and the weakened tissue is invaded and goes soft, brown, and stringy. Because the damage is underground you usually see it first as something that looks like drought: wilting, yellowing, stunting, a plant that does not respond to being watered. Overwatering, heavy compacted ground, a low spot that collects runoff, a pot with no drainage or a saucer left standing full, and cold wet soil in winter are the usual causes. Once roots have actually rotted there is no cure - this is a problem you prevent rather than treat.
AphidsSeverity Medium PestSeason: May–AugDense clusters of tiny insects packed onto shoot tips, flower buds, and the undersides of young leaves.
Watch mainly because aphids vector bean mosaic virus into the crop; the feeding itself is usually minor on vigorous plants. A reflective mulch deters them early.
Dense clusters of tiny insects packed onto shoot tips, flower buds, and the undersides of young leaves. Curled, cupped, or distorted new growth that never opens properly. A sticky shine on the leaves - and on whatever sits under the plant - that later goes black with sooty mold. Tiny white cast skins left behind where a colony has been feeding. Ants running steadily up and down the stems, which is often the first thing you notice. Mottled, streaked, or misshapen leaves that do not grow out can mean a virus the aphids brought with them rather than the feeding itself.
Knock the colonies off with a hard jet of water and repeat every few days - on most plants that alone ends it. Pinch out or prune off the worst-infested tips rather than treating the whole plant. If colonies keep rebuilding, spray insecticidal soap or horticultural oil directly onto the insects, covering leaf undersides, and repeat weekly until they are gone; treat early or late in the day, and never spray a wilted or heat-stressed plant. Avoid broad-spectrum insecticides - they kill the ladybugs, lacewings, and parasitic wasps that were about to solve the problem for you, and aphid numbers usually come back worse afterward. Anything you spray must be labeled for the plant you are treating; follow that label and observe its pre-harvest interval. On anything you eat, wash leaves, heads, and buds well before use, since aphids hide down in crowns, folds, and tight growth.
Go easy on nitrogen: the soft, lush growth that heavy feeding produces is exactly what aphids breed on. Check new growth once a week through spring and early summer so you catch colonies while they are still small, and rub the first few out with your fingers. Leave flowering plants nearby and skip broad-spectrum sprays - ladybugs, lacewings, hoverflies, and parasitic wasps do most of this work for free, and they only stay if there is something for them to eat. Keep ants off the plant where you can, since they protect aphids from those predators. Water steadily so plants are not stressed, and check any new plant over before you bring it home or move it indoors, since aphids usually arrive on something else.
Aphids are small soft-bodied sap-suckers - green, black, gray, pink, or waxy white, and mostly wingless - that gather in dense colonies on the tenderest new growth: shoot tips, buds, and the undersides of young leaves. They breed extremely fast in mild weather, so a few can become hundreds inside a week. Their feeding curls and distorts soft growth, and the sticky honeydew they excrete coats everything below and turns black with sooty mold. Ants often farm and defend the colonies for that honeydew. A few aphids are normal on almost any plant and a healthy plant shrugs them off; only dense, persistent colonies do real damage, and some aphids also spread plant viruses as they feed.
Bean AnthracnoseSeverity Medium DiseaseSeason: Jun–AugSunken, dark-bordered spots on pods (pink ooze in humidity), reddish-brown streaks on stems and leaf veins, seed with dark blotches.
New host-specific slug for the Phaseolus bean files; the seed-borne nature makes clean seed the key defense.
Sunken, dark-bordered spots on pods (pink ooze in humidity), reddish-brown streaks on stems and leaf veins, seed with dark blotches.
Remove and destroy infected plants; copper can protect healthy foliage in a wet season. Don't save seed from infected plants.
Start with clean, disease-free seed; never save seed from infected plants; never work wet plants; rotate 2-3 years; clear debris.
A seed- and splash-borne fungus (Colletotrichum lindemuthianum) causing dark, sunken lesions on pods, stems, and leaf veins - and because it is seed-borne, it carries straight into next year's crop through saved seed, making it especially serious for dry-bean growers.
Bean RustSeverity Medium DiseaseSeason: Jun–SepSmall raised rusty-orange pustules ringed with yellow, mostly on the leaf undersides and usually starting low in the plant where humidity is highest, followed by yellowing, browning and early leaf drop once it takes hold.
Concentrated leaf loss while the pods are filling is what costs you the crop. A shared bean-family disease, kept on its own slug so it stays distinct from cereal and allium rusts.
Small raised rusty-orange pustules ringed with yellow, mostly on the leaf undersides and usually starting low in the plant where humidity is highest, followed by yellowing, browning and early leaf drop once it takes hold.
Strip the worst-affected leaves early, starting with the lower ones. Sulfur slows the spread in a wet season; copper is not effective against rust. A late infection often still allows a full harvest, and fungicides are rarely needed in a home garden.
Grow resistant or tolerant varieties where they are offered, space and train for airflow, water at the base so the leaves stay dry, and rotate beans on a two to three year cycle. Remove crop debris after harvest rather than leaving it to carry the fungus over.
A fungal disease (Uromyces) of bean-family plants, producing raised rusty orange-brown pustules on the leaves and sometimes the stems, mostly on the undersides and ringed with yellow. Heavy infection browns and drops the foliage, and losing leaf area during pod fill directly shrinks the crop. It is worst in warm, humid weather and wherever the leaves stay wet.
Japanese BeetlesSeverity Medium PestSeason: Jun–AugClusters of shiny metallic beetles massed together on the upper, sunniest foliage and down inside open blooms, heaviest on warm sunny afternoons from around late June.
A shared generalist pest across the legume group and beyond; damage is worst during the few weeks of peak flight. Row cover through the peak protects young plants.
Clusters of shiny metallic beetles massed together on the upper, sunniest foliage and down inside open blooms, heaviest on warm sunny afternoons from around late June. Leaves reduced to lace, with the veins left intact and the tissue between them gone - unmistakable, and quite different from the ragged chewing of a caterpillar. Ragged, chewed petals and blooms that never open properly. Beetles that let go and drop straight to the ground when you disturb the plant. Feeding damage on ripening fruit, on the plants they also take fruit from. Whole branches going brown and lacy at the top of a plant while the shaded lower growth stays untouched.
Persistent morning hand-picking into soapy water is the most effective home control there is, and on a vigorous established plant the damage is usually cosmetic and needs nothing else. Neem deters feeding rather than killing, and has to be reapplied. For heavy pressure, spinosad or a targeted insecticide labeled for the plant will work - but time any spray away from bloom and apply it at dusk to protect bees, and observe the pre-harvest interval on anything you eat. On flowering plants, some gardeners simply shear the blooms off for a couple of weeks and let the plant rebloom once the wave has passed, which removes the lure as well as the damage. Young plants and young trees are the ones worth defending: a mature tree or an established vine tolerates several weeks of leaf loss without lasting harm.
Hand-picking is genuinely the main defense in a home garden. Go out in the cool of the morning while the beetles are sluggish, hold a tub of soapy water underneath, and knock them in - they drop when disturbed, so most fall straight into it. Do it daily through the flight: because the beetles call each other in, taking them off early stops a plant becoming a beacon. Do not put pheromone or lure traps anywhere near the garden - they demonstrably pull in far more beetles than they catch. And do not count on lawn grub control: milky spore has performed poorly and inconsistently in field trials across most of the US, and treating your own turf does not reduce the adults feeding on your plants, because they fly in from surrounding properties. Where it is practical, row cover or netting through the peak flight excludes them outright. Otherwise riding out the six-to-eight-week wave is a legitimate strategy, since most established plants absorb the damage.
Japanese beetles are metallic green-and-copper beetles about half an inch long that emerge in early summer and feed for six to eight weeks. They feed in aggregating masses - one beetle's feeding releases a scent that draws in more - so a plant goes from untouched to covered in a couple of days. They chew the soft tissue between the leaf veins and leave the veins standing, so the leaf ends up as a brown lace skeleton, and they shred open flowers and sometimes ripening fruit as well. They work the sunniest upper parts of a plant on warm afternoons. The white C-shaped grubs spend the rest of the year in turf and pasture soil eating grass roots, and the adults then fly in from wherever they hatched, which can be some distance away.
Good & bad neighbors
Plant nearby
-
French marigolds suppress root-knot nematodes and are widely interplanted with beans.
-
The three-sisters partner: beans fix nitrogen the heavy-feeding corn uses, and corn shelters the row.
- Traditional pairings, thin evidence
-
Different root depths mean no competition, and beans enrich the shared bed.
-
Shares warm-season timing and benefits from the nitrogen beans add to the bed.
-
Traditional pairing said to be mutually pest-deterrent (beans vs. potato beetle, potato vs. bean beetle); evidence is soft.



Keep apart
-
Like the other alliums, credited with stunting beans and suppressing their root bacteria.
-
Fennel's root exudates inhibit most garden vegetables, beans included - give it its own corner.
-
Same legume-allium conflict - keep garlic away from the bean bed.
-
Alliums are widely reported to inhibit legume growth and their nitrogen-fixing bacteria.


Varieties · 10
You pick one when you add Snap Bean to your garden. Its days to maturity set your harvest window.
Provider
The most dependable first bean: fast, forgiving, and famous for germinating in cooler, damper soil than other beans tolerate, so it's the one to sow earliest.
Variety details for Provider
Straight, round, medium-green pods about 5-6 inches long on compact bushes.
bushgreenearlycool-soilResists Common Bean Mosaic Virus, Downy Mildew, Powdery Mildew
Heavy sets of round, medium-green 5-6 inch pods with a strong disease package. If you plant one bush bean, plant this. Also sold simply as 'Provider Bush' - that is the same cultivar, not a different one.
Contender
A classic early bush bean that tolerates both cool springs and summer heat better than most, producing high yields of slightly curved, stringless 6-8 inch pods with rich old-fashioned bean flavor.
Variety details for Contender
Medium-green, slightly curved round pods, 6-8 inches long.
bushgreenearlyheat-tolerantResists Common Bean Mosaic Virus, Powdery Mildew
A reliable Southern favorite.
Blue Lake Bush
The bush form of the legendary Blue Lake line, bred for the cannery and still prized for straight, round, tender, stringless pods with classic sweet bean flavor.
Variety details for Blue Lake Bush
Straight, round, smooth medium-green pods, 5-6 inches long.
bushgreenstringlesscanningResists Common Bean Mosaic Virus
Sets a concentrated crop that's ideal for putting up a batch at once. Usually sold as 'Blue Lake Bush 274' or just 'Blue Lake 274' - the same bush strain. The original pole Blue Lake is a different plant; see the separate 'pole-bean' catalog entry for it.
Royal Burgundy
The easy purple bush bean: vivid violet pods that are simple to spot for picking and that turn deep green when cooked.
Variety details for Royal Burgundy
Striking deep-purple, straight, slender pods over green foliage.
bushpurplecool-soilResists Common Bean Mosaic Virus
Germinates well in cool soil and tolerates a range of conditions - a favorite with kids for the color trick.
Roma II
The bush Italian flat (romano) bean: wide, meaty, flat pods with a fuller, richer flavor than round green beans and a texture that holds up in long-cooked dishes.
Variety details for Roma II
Broad, flat, medium-green pods, 4-5 inches long.
bushromanoflat-poddedResists Common Bean Mosaic Virus
Heavy-yielding and a stand-out for the kitchen.
Maxibel
A French filet (haricot vert) bean prized by cooks for long, slender, dark-green pods best picked pencil-thin and tender.
Variety details for Maxibel
Very slender, straight, dark-green pods up to 7 inches long.
bushfiletgourmetPick often and young for the gourmet texture that makes filet beans worth the extra vigilance.
Grower tips
Notes from growers, tagged with the zone they grow in. A person reads every post before it appears.
Nobody has posted about Snap Bean yet. The first one usually saves someone a season.
Free account. Your post shows your grower name and zone, never your email.