Add it to your home screen and it opens full screen: no browser bars, one tap away, and everything stays signed in. Free, nothing to download from an app store.
- Tap the Share button in your browser
- Scroll down and choose “Add to Home Screen”
- Open GrowSomeFood from your home screen
- Open your browser’s menu
- Choose “Add to Home screen” or “Install app”
- Open GrowSomeFood from your home screen
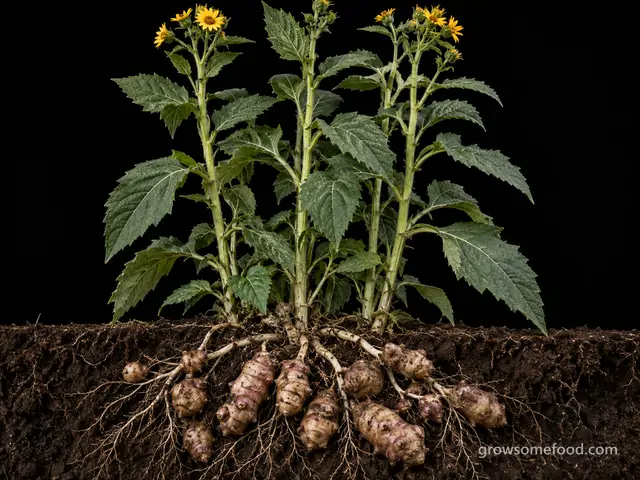
Sunchoke
A perennial North American sunflower grown for knobby, nutty tubers - the easiest food crop here to grow, and the hardest to get rid of once you have it.
No part of the plant is toxic and the tubers are good food - the caution here is digestive, not chemical. Sunchokes store their carbohydrate as inulin, which humans cannot digest; gut bacteria ferment it instead, and a first large helping causes gas, bloating and cramping in a lot of people. Start with a small portion, cook them thoroughly, and build up over several meals. Slow cooking, pickling and fermenting break some of the inulin down. Anyone with IBS should be especially careful.
Overview
The one thing to knowThe catch is written into the same biology: every fragment left in the ground grows again, so planting sunchokes is a long-term decision.
The sunchoke (Helianthus tuberosus) is a perennial sunflower from central and eastern North America, grown not for its seed but for the knobby tubers it swells underground. They are crisp and faintly sweet raw - somewhere between a water chestnut and a raw artichoke heart - and turn nutty and creamy roasted. The plant is neither an artichoke nor from Jerusalem: the old name is an English mangling of girasole, the Italian for sunflower, and an early taste comparison did the rest.
One tuber makes a 6-to-10-foot stand of rough-leaved stems topped with small gold sunflowers in fall, and by the first frost the roots below carry pounds of crop. It shrugs off cold, poor soil, and neglect, and it is hardy from zone 3 to zone 9. The catch is written into the same biology: every fragment left in the ground grows again, so planting sunchokes is a long-term decision. Give the patch its own bed or a bottomless container and it is one of the most generous crops you can grow. Drop it in the middle of a rotated vegetable garden and you will be pulling it out for years.
Quick facts
- Life cycle
- Perennial, lives about 20 years
- Height
- 8 ft5 to 12
- Spread
- 30 in18 to 48
- Cold
- Takes hard frostdamaged below -40°F
- Heat
- Struggles above 100°F
Full sun or part sun · medium water · well-drained soil · 24 in apart (18 to 36) · tubers
When to plant
Nothing is open today. Fall planting opens in 4 days, Sep 25 to Nov 1.
- Plant tubers Sep 25 – Nov 1 Opens in 4 daysAbout 4 weeks before to 7 days after your first frost (Oct 25 here)Fall planting works well: tubers overwinter in place and sprout on their own schedule in spring. Mulch the bed after the ground chills.
- Plant tubers Mar 6 – Apr 24 Opens in 166 daysAbout 5 weeks before to 2 weeks after your last frost (Apr 10 here)
Frost here: last around Apr 10 (Mar 27 to Apr 24 most years), first around Oct 25. Zone averages, your own yard may run a week or two either way.
Life stages
Four stages to settle in, then one that repeat each year. Windows are typical; your zone and weather move them.
Sprouting from the tuber
Day 0 to 30 from planting- DoPlant tubers 4-6 inches deep, 18-24 inches apartSet each tuber (or a piece with two or three buds) on its side 4-6 inches down in loosened soil. They sprout slowly in cold ground and often take three to five weeks to break the surface - that silence is normal, not failure.
- WaterWater once at planting, then leave them aloneSunchokes are drought-tough and rot more easily than they dry out. Water the bed in at planting and then only during real dry spells until the shoots are up and growing.
- ProtectSet the containment now, before anything sproutsThis is the only easy moment to do it. Ring the bed with solid edging sunk 18-24 inches, plant into a bottomless container, or accept that the whole bed belongs to sunchokes from here on. Retrofitting a barrier around an established stand is far harder.
Watch for- Slow, uneven emergence (normal - give them five weeks)
- Slugs shearing off the first tender shoots
- Shoots appearing outside the bed edge
Stem growth
Day 35 to 115 from planting- WaterWater deeply in dry spells while the stems shoot upweeklyAn inch a week through midsummer is plenty. Sunchokes crop on neglect, but a bed that bakes bone dry in July sets fewer and smaller tubers.
- PruneCut the stems back to about 4 feet in early summerAround late June, shortening 6-foot stems to roughly 4 feet makes them stockier, stops them flattening in a thunderstorm, and does not cost you tubers. Skip it and expect to be staking a leaning 9-foot hedge in August.
- WeedPatrol the bed edge for escapeesevery 3 weeksWalk the boundary every few weeks and pull any shoot that has come up outside the line while it is small and still attached to a findable tuber. Ten minutes now beats a season of digging later.
- FertilizeDo not feed themSunchokes crop heavily in ordinary, even poor soil. Rich nitrogen buys you a taller, floppier stand of leaves and no extra tubers.
Watch for- Stems leaning or flattening after storms
- Deer and groundhogs browsing the tops
- Powdery mildew dusting the lower leaves
Late-summer sunflowers
Day 115 to 155 from planting- InspectEnjoy the bloom and leave it for the beesSmall bright-gold sunflowers, two to three inches across, open at the top of the stems from late summer into fall - a genuinely valuable late nectar source when little else is flowering. Cutting them for the vase does no harm; in the coldest zones frost often arrives before they open at all.
Watch for- Bees and late-season pollinators working the flowers
- In short seasons, frost arriving before bloom (tubers are unaffected)
Digging (after frost)
Day 120 to 170 to the first pull from planting, picking to about day 240- HarvestDig after the first hard frost blackens the topsevery 10 daysFrost is what makes them taste good: cold weather converts some of the inulin to sweeter sugars, so tubers dug in November are noticeably better than the same tubers in September. Cut the stalks to a few inches as markers, then fork wide of the row and lift.
- HarvestDig only what you need and leave the rest in the groundThe ground is the best storage this crop has - tubers stay crisp there and shrivel fast in a kitchen. Where the soil does not freeze solid, dig through winter as you cook; where it does, mulch the bed a foot deep with leaves so you can keep getting a fork in.
- DoSift the soil as you go if you want the bed backIf this is the last year you want sunchokes here, work the bed over methodically, break up every clod, and pick out every fragment you can find. You will still miss some - plan on a follow-up pass next spring.
Watch for- Tubers left behind (they are next year's crop, wanted or not)
- Voles working the row under mulch
- Thin-skinned tubers drying out within days of digging
Winter
Nov to Mar, every year- MulchMulch deep so you can keep diggingA foot of straw or shredded leaves over the row keeps the ground workable well into winter in cold zones and protects the tubers you are saving for spring planting.
- WeedDo the spring containment sweep before shoots get awayIn early spring, before the bed sprouts, walk the surrounding ground and dig out any tuber that traveled. Sunchoke shoots are easy to pull at six inches and a real job at six feet.
Watch for- Stray shoots emerging outside the bed in spring
- Tubers heaving to the surface in freeze-thaw cycles
Harvest
- Tops blackened by the first hard frost - flavor is best after that
- Tubers firm, knobby and full-sized when you fork up a test plant
- Skin still thin and easily scuffed - that is normal, and why they store in the ground
- Dig after the first hard frost blackens the tops · every 10 days
- Dig only what you need and leave the rest in the ground
- Sift the soil as you go if you want the bed back
Per plant 1.5 to 10 lbPicking pick as they ripenFirst crop 1 yrs
Cook with sunchokes
Watch out for
6 to know. 1 is high-risk: Tuber Spread (the patch is permanent). 4 are active in September.
Tuber Spread (the patch is permanent)Severity High DisordernowSunchokes are worth growing - just site them deliberately.
The three arrangements that work are a permanent dedicated bed, a sunken bottomless container, or buried edging; the arrangement that fails is a spot in a rotated vegetable garden.
Shoots emerging outside the bed edge in spring, in paths, in the lawn, or in the next bed over. New shoots coming up through whatever crop replaced the sunchokes, year after year. The stand visibly wider each season than the last. Tubers turning up when you dig anywhere within several feet of an old patch. Shoots appearing around a compost heap or a spot where surplus tubers were dumped.
Clearing a patch is a season of work, not a weekend. Dig the whole bed over in fall, breaking up every clod and picking out every fragment, then dig it again in spring when the survivors sprout and show you where they are. After that the reliable method is exhaustion: cut or pull every shoot as soon as it reaches six to twelve inches, every time, right through one full growing season - each removal costs the tuber reserves it cannot rebuild without leaves. Sheet mulching with cardboard and a deep mulch layer weakens a patch but rarely finishes it alone. Do not rototill at any stage. Expect stragglers the following year and keep pulling them.
Decide the containment before you plant, because it is far harder to retrofit. Give sunchokes a dedicated permanent bed, a bottomless container or stock tank sunk in the ground, or solid edging buried 18-24 inches around the patch. Never rototill a sunchoke bed or the ground near one - tilling cuts the tubers into hundreds of viable pieces and turns a patch into a field. Walk the boundary every few weeks through the season and pull escaped shoots while they are small and still attached to a findable tuber. Never compost tubers and never dump surplus in a wild corner; bag them for the trash or eat them. Dig the bed over every year, which both improves tuber size and keeps you aware of how far it has traveled.
Not a pest but the defining problem of growing sunchokes: the crop and the propagule are the same thing. Any tuber, or piece of a tuber, left in the ground sprouts the following spring - and pieces are always left, because the tubers are brittle, scatter well outside the row, and grow deeper than a fork reaches. A stand also creeps outward a foot or two a year on short rhizomes, and shades out whatever is behind its 6-to-10-foot stems. Gardeners commonly report two to four seasons of repeated digging and shoot-pulling to clear a bed they wanted back, and the species has naturalized widely across North America from exactly this persistence. None of this is a reason not to grow sunchokes - it is a reason to decide where they live before you plant one.
Deer (browse resistance)Severity Medium WildlifenowDeer and groundhogs both browse sunchoke tops hard through summer, and repeated grazing of a stand cuts tuber size even though the crop itself is underground and untouched.
Plants regrow readily, so this is a yield problem rather than a survival one.
Growth cleanly missing overnight, with the plant browsed back to a level line about as high as a deer can comfortably reach. Ragged, torn stem ends rather than the clean angled cut a rabbit leaves - the single most reliable identifier. Buds and flowers gone while the foliage below is untouched, since deer often take the best part first. Hoof prints and droppings in soft ground near the damage. Repeat visits, with fresh damage each morning once a planting has been found. On young trees, shredded and stripped bark and broken low branches in autumn - that is antler rubbing rather than feeding.
There is no chemical fix, only exclusion and recovery. Get physical protection up immediately after the first damage, because deer return to a known meal, and reinforce or rotate whatever you were relying on before. Most plants regrow from browsing if the crown and roots are intact - feed and water a grazed plant and protect the regrowth while it comes back. What does not recover in the same season is anything whose buds or flowers have been taken, and a young tree whose bark has been rubbed right around the trunk is usually lost. Where deer pressure is genuinely heavy, the honest answer is to fence properly or to grow the plants deer leave alone, rather than to keep replacing losses.
Fencing is the only thing that reliably works. Eight feet is the standard for excluding deer, or two parallel four-foot fences a few feet apart, which they will not jump because they cannot judge the landing. Short of that, cage individual plants: a sturdy wire cage or trunk guard around every young tree, left on until the trunk is thick and the canopy is above browse height, prevents both browsing and antler rubbing and is the single highest-value thing you can do for a young tree. Repellent sprays do help at moderate pressure, but they wash off and deer habituate, so reapply after rain and rotate between different types through the season. Motion-activated sprinklers, scent deterrents, and noise devices work for a while and then stop. Siting matters too: plants close to the house, in daily traffic, and screened behind other planting get browsed less than the same plant out at the boundary.
Deer are the largest garden problem across much of the country, and where pressure is high they set the limit on what you can grow at all. They browse at night and around dawn and dusk, taking tender shoots, leaves, buds, flowers, and fruit within about five feet of the ground, and they come back night after night to anything they have found and liked. Because they have no upper incisors they tear rather than cut, leaving ragged stem ends - that is how you tell deer damage from a rabbit's clean angled cut. In fall, bucks rub their antlers on young trunks and can strip the bark right around a stem, which kills a young tree outright. Palatability varies enormously between plants and between seasons: a herd short of food in late winter eats things it ignores in June, and no plant is truly deer-proof.
White Mold (Sclerotinia)Severity Medium DiseasenowOn sunchokes this shows up as stalk rot in a crowded stand late in summer, usually after the tubers are already bulking, so it costs less than it looks like it should.
Digging the bed over every year and thinning the stand is the practical control.
Water-soaked, bleached or tan lesions on stems, often starting at a leaf joint or where a stem fell against damp soil. Dense white cottony growth on the lesion in humid weather. Hard black lumps inside a split stem or on its surface. Whole stems wilting and dying above an otherwise healthy base. Damage worst in the crowded middle of a stand and after a wet spell.
There is no cure for an infected stem. Cut affected stems out well below the rot and bag them rather than composting, so the black resting bodies do not go back into your soil. Improve spacing and airflow for the following season and rotate the bed if you can. Fungicides are of little practical use to a home gardener here; sanitation and spacing do the work.
Airflow is the whole defense. Space plantings properly, thin dense stands, and keep the ground clear of the previous season's rotted stems. Water at the base rather than overhead and water in the morning. Avoid heavy nitrogen, which makes soft, dense growth that stays wet. Rotate away from other susceptible crops - beans, sunflowers, lettuce, brassicas and carrots are all hosts - rather than following one with another in the same ground.
A soil-borne fungus (Sclerotinia sclerotiorum) with a very wide host range that rots stems, stalks and crowns in cool, wet, crowded conditions. It grows a distinctive dense white cottony mold on affected tissue and forms hard black resting bodies, the size and look of rat droppings, inside and on the rotted stems. Those resting bodies survive in soil for years, which is why an infected bed stays infected. Infection usually starts where dead flowers, dense foliage or a lodged stem holds moisture against the plant, then spreads downward, and a girdled stem wilts and collapses above the rot.
Powdery MildewSeverity Low DiseasenowAlmost universal on the big rough leaves of a crowded sunchoke stand from August on, and almost always cosmetic - the tubers are bulking underground by then and the tops die at frost anyway.
Thin the stand and skip the spray.
Round white powdery spots on the upper leaf surfaces that spread and merge until whole leaves look dusted. It usually starts on the oldest, lowest, most shaded leaves and works upward, so check there first. Look at the undersides too, and at stems, buds, and flower stalks, which get coated as it advances. Leaves that yellow, brown, curl, or go crisp and drop early under the coating. New growth that opens small, crumpled, or twisted where the fungus has reached the shoot tips. On plants where it gets onto the fruit, a dull gray film, russeted or scarred skin, and cracking. Late in the season, tiny dark specks scattered through the white felt - that is the fungus setting up to overwinter on the debris.
Start early: sprays protect healthy tissue, they do not clean up leaves that are already coated. Pick off and bin the worst leaves as soon as you see them, and open the plant up by thinning or pruning so air moves through. On anything that regrows quickly, shearing the whole plant back forces a clean flush and beats spraying. If it keeps spreading, potassium bicarbonate, horticultural oil, or neem applied weekly will hold it - cover both leaf surfaces. Sulfur also works, but it burns the foliage of some plants, should never go on in heat, and must not be mixed with or applied close behind an oil spray. Whatever you use must be labeled for the plant you are treating: follow that label and observe its pre-harvest interval on anything you eat. Do not compost badly infected material. Late-season mildew on a plant that is finishing anyway is usually cosmetic; on a crop still filling out it is worth acting on.
Give plants room. Crowding and still air are the biggest single driver, so space at the full recommended distance, thin seedlings properly, and divide or prune out congested growth until air moves through the plant. Full sun and an open position help; deep shade and a still corner against a wall are where it always starts. Water at the base rather than overhead, and water early in the day so nothing stays damp overnight. Keep plants evenly watered - drought stress at the roots leaves them far more susceptible, even though the fungus itself likes dry air. Go easy on nitrogen, since soft lush growth is the most vulnerable. Where resistant varieties exist for what you are growing, choosing one is the single most effective thing you can do on a plant that mildews every year. Clear infected leaves and stems away at the end of the season rather than composting them.
Powdery mildew is a fungal disease that coats leaves - and often stems, buds, and fruit - in a white-to-gray powder that looks like spilled talcum. It is not one fungus but a large family of them, each fairly specialised to its own group of plants, which is why mildew on one crop rarely jumps to an unrelated one beside it. Unlike most leaf diseases it does not need wet leaves: it thrives on warm dry days followed by humid nights, and it takes hold fastest where plants stand crowded in still air or in shade. The coating blocks light, so heavily covered leaves yellow, brown, and drop early. On many plants that is mostly disfiguring and arrives late enough not to matter; where it strips away the leaves a crop still needed to finish, it costs you size, sweetness, and quality.
Slugs & SnailsSeverity Low PestOnly the first tender shoots in spring are worth defending; once the stems toughen and take off, slugs stop mattering entirely.
A wet spring can thin a new planting, so check emerging shoots after rain.
Irregular ragged holes chewed out of the middle of leaves and along the edges - not the clean-edged cuts a caterpillar leaves. Seedlings that vanish overnight, or that are cut off at soil level with nothing left behind. Silvery dried slime trails across leaves, soil, pots, and paving in the morning: this is the giveaway that tells you it was mollusks rather than an insect. Chewed pits in ripe fruit, especially where it rests on the ground. Damage that shows up on the lowest, dampest leaves first and gets worse after rain or evening watering. Turn over a board, an upturned pot, or a clump of dense mulch during the day and look for the animals themselves sheltering in the cool underneath.
Hand-picking works and costs nothing: go out an hour after dark with a headlamp, drop what you find into soapy water, and repeat nightly for a week or two - persistence is what wins, not any single product. Shallow beer traps sunk to soil level catch them too, but need emptying and refilling daily to be worth anything. Iron-phosphate bait is the standard control and is far lower-risk around pets and wildlife than the old metaldehyde products, but it is not harmless: many formulations include EDTA, and a dog that eats a quantity of pellets can develop iron toxicosis. Scatter it thinly per the label, never in piles, and keep dogs off a baited bed. Clear fallen foliage and debris in autumn, where the eggs are laid. In a wet climate this is a population you manage each season rather than one you eradicate - and on most established plants light grazing is cosmetic and needs nothing at all.
Take away the daytime shelter first: lift boards and upturned pots, clear piles of debris, keep dense mulch pulled back from crowns and stems, and give crowded plantings enough airflow to dry out. Water in the morning rather than the evening so the surface is dry by the time they come out. Copper tape around containers and raised beds gives them a shock they will not cross, and it is the one barrier that reliably works. Get plants past the vulnerable stage quickly - start seedlings in pots and set them out at a decent size rather than direct-sowing into a cold wet bed, since most plants stop being worth defending once the leaves toughen. Leave the ground beetles, frogs, toads, and ground-feeding birds alone, because they eat mollusks all night for free and broad-spectrum slug pellets kill them too. Where thick-leaved or resistant varieties exist for what you are growing, they take far less damage.
Slugs and snails are nocturnal mollusks that rasp ragged holes in soft leaves, shear off seedlings at ground level, and chew into ripe fruit that touches the soil. They feed at night and in the early morning and spend the day hidden under boards, pots, dense mulch, leaf litter, and low foliage, becoming active in exactly the cool, damp, shaded conditions that suit young plants. Damage is heaviest in wet spells and on tender spring growth: a single wet week can erase a row of seedlings while an established, tough-leaved plant of the same species is barely marked. They lay clusters of small pearly eggs in damp soil and under debris, so a garden with plenty of cover carries a resident population year after year rather than being invaded from outside.
AphidsSeverity Low PestColonies build on the soft shoot tips in early summer and are almost always cosmetic here - the crop is underground and the plant has growth to spare.
The late-June cut-back removes most of the infested tips along with the height.
Dense clusters of tiny insects packed onto shoot tips, flower buds, and the undersides of young leaves. Curled, cupped, or distorted new growth that never opens properly. A sticky shine on the leaves - and on whatever sits under the plant - that later goes black with sooty mold. Tiny white cast skins left behind where a colony has been feeding. Ants running steadily up and down the stems, which is often the first thing you notice. Mottled, streaked, or misshapen leaves that do not grow out can mean a virus the aphids brought with them rather than the feeding itself.
Knock the colonies off with a hard jet of water and repeat every few days - on most plants that alone ends it. Pinch out or prune off the worst-infested tips rather than treating the whole plant. If colonies keep rebuilding, spray insecticidal soap or horticultural oil directly onto the insects, covering leaf undersides, and repeat weekly until they are gone; treat early or late in the day, and never spray a wilted or heat-stressed plant. Avoid broad-spectrum insecticides - they kill the ladybugs, lacewings, and parasitic wasps that were about to solve the problem for you, and aphid numbers usually come back worse afterward. Anything you spray must be labeled for the plant you are treating; follow that label and observe its pre-harvest interval. On anything you eat, wash leaves, heads, and buds well before use, since aphids hide down in crowns, folds, and tight growth.
Go easy on nitrogen: the soft, lush growth that heavy feeding produces is exactly what aphids breed on. Check new growth once a week through spring and early summer so you catch colonies while they are still small, and rub the first few out with your fingers. Leave flowering plants nearby and skip broad-spectrum sprays - ladybugs, lacewings, hoverflies, and parasitic wasps do most of this work for free, and they only stay if there is something for them to eat. Keep ants off the plant where you can, since they protect aphids from those predators. Water steadily so plants are not stressed, and check any new plant over before you bring it home or move it indoors, since aphids usually arrive on something else.
Aphids are small soft-bodied sap-suckers - green, black, gray, pink, or waxy white, and mostly wingless - that gather in dense colonies on the tenderest new growth: shoot tips, buds, and the undersides of young leaves. They breed extremely fast in mild weather, so a few can become hundreds inside a week. Their feeding curls and distorts soft growth, and the sticky honeydew they excrete coats everything below and turns black with sooty mold. Ants often farm and defend the colonies for that honeydew. A few aphids are normal on almost any plant and a healthy plant shrugs them off; only dense, persistent colonies do real damage, and some aphids also spread plant viruses as they feed.
Good & bad neighbors
Plant nearby
- Traditional pairings, thin evidence
-
A living mulch under the tall stems that holds the soil, feeds pollinators before the sunchokes bloom, and makes stray sunchoke shoots outside the bed easier to spot against a low even cover.
-
Not a growth benefit - a siting one. Both crops come back forever from root fragments, so putting them together in one fenced-off, never-rototilled corner keeps the two hardest-to-remove plants in the garden in the same place instead of two.
-
Same logic: mint is another permanent-bed plant, and a contained corner shared with sunchokes wastes no rotated ground. Mint will not out-compete a 9-foot sunchoke stand, though it will happily fill the shaded soil beneath it.


Keep apart
-
Stands in for any short crop: by midsummer sunchokes are a 6-to-10-foot wall casting deep shade, and anything low on their south side stops growing. Plant sunchokes on the north edge of the garden and keep salad beds well clear.
-
Never put sunchokes in ground you intend to grow potatoes in. Both are dug crops and both regrow from missed pieces, so the two become impossible to separate - and every potato harvest chops and spreads any sunchoke tubers left behind.
- Traditional pairings, thin evidence
-
Same genus, so they share sunflower mildew, rust and stem pests, and both are tall and allelopathic enough to suppress what grows beneath them. Give them separate ground rather than doubling the pest pressure in one bed.


Varieties · 6
You pick one when you add Sunchoke to your garden. Its days to maturity set your harvest window.
Stampede
Large, pale, distinctly knobby tubers in a tight cluster under the crown.
earlylarge-tubersknobbycold-hardyThe standard early variety and the best choice for short northern seasons: large white knobby tubers that bulk up weeks ahead of most others, on stems that stay comparatively short. Widely available and dependable, though the knobs make it more work to clean than the smooth types.
Red Fuseau
Elongated, smooth, red-skinned tubers with white flesh.
smoothelongatedeasy-to-cleanred-skinThe cook's variety: long, smooth, carrot-shaped tubers with rosy-red skin and very few knobs, so scrubbing and peeling are genuinely quick. Yields are a little lower than the knobby types, and it needs a longer season, but the ease of cleaning wins most kitchens over.
White Fuseau
Long, smooth, pale tan tubers with creamy white flesh.
smoothelongatedeasy-to-cleanThe pale-skinned counterpart to Red Fuseau, with the same long, smooth, low-knob shape that makes preparation easy. A good middle ground between yield and convenience, and a traditional French market type.
Mammoth French White
Large, rounded, white, heavily knobbed tubers; stems to 10 feet.
high-yieldlarge-tubersknobbytallAn old high-yielding type grown for bulk: big, rounded, white knobby tubers in heavy clusters on very tall stems. The pick if you want the most food per square foot and do not mind scrubbing knobs; also the one most likely to need cutting back in June to stop it flattening.
Clearwater
Rounded but relatively smooth white tubers with shallow eyes.
smoothwhiteproductiveA smoother-skinned white selection chosen for clean, easily washed tubers and good yields - a useful compromise between the fuseau types and the heavy croppers. Availability varies by nursery and season; it circulates mostly through specialist tuber growers.
Sugarball
Round to oval red-purple tubers with crisp white flesh.
sweetroundred-skinA round, red-skinned selection grown for sweetness and good raw-eating quality, popular for slicing into salads. Like several named sunchokes it moves between specialist growers rather than mainstream catalogs, so expect to hunt for it.
Grower tips
Notes from growers, tagged with the zone they grow in. A person reads every post before it appears.
Nobody has posted about Sunchoke yet. The first one usually saves someone a season.
Free account. Your post shows your grower name and zone, never your email.