Add it to your home screen and it opens full screen: no browser bars, one tap away, and everything stays signed in. Free, nothing to download from an app store.
- Tap the Share button in your browser
- Scroll down and choose “Add to Home Screen”
- Open GrowSomeFood from your home screen
- Open your browser’s menu
- Choose “Add to Home screen” or “Install app”
- Open GrowSomeFood from your home screen
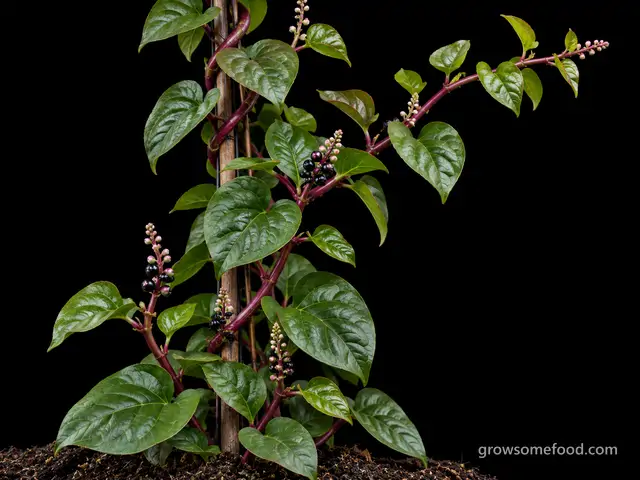
Malabar Spinach
Not spinach at all, but a tropical climbing vine that thrives in exactly the heat that makes true spinach bolt. Thick succulent leaves, a slight okra-like slipperiness, a six-foot trellis, and a harvest that runs from July to frost.
Leaves, young stems and shoot tips are the food, and they are better lightly cooked than eaten raw by the bowlful - like true spinach this is a high-oxalate green, worth moderating if you are prone to kidney stones. Nothing on the plant is toxic. The dark berries are not a food: they are bland, and full of a violently staining purple dye that marks hands, clothes, decking and grout for weeks. Save them for seed or dye, and site the trellis away from pale paving.
Overview
When true spinach gives up in June, this is what you grow instead. Malabar spinach is not related to spinach at all - it is Basella alba, a tropical twining vine from Asia, and where Spinacia bolts at the first hot week, Malabar only really starts once night temperatures stay above 60°F. From then until frost it climbs six to ten feet up a trellis and hands you thick, glossy, succulent leaves every few days.
The flavor is mild and faintly earthy, somewhere between spinach and chard, and the texture is the thing to know about: the leaves are mucilaginous, slippery in the way okra is. Cooks across South and Southeast Asia use that deliberately - it thickens dals, soups and stews beautifully - and it disappears almost entirely under a fast, hot stir-fry or a squeeze of lime. If you were expecting a raw salad green that behaves exactly like spinach, that is the one adjustment to make.
It is also one of the handsomest edible plants you can grow. The red-stemmed form (‘Rubra’) is a genuine ornamental on an arch or fence, and the whole plant is nearly pest-free, grows happily in a large container, and takes humidity and heat that flatten everything else in the bed. Frost kills it outright, so in most of the country it is a summer annual - but a cutting rooted in a jar of water on the windowsill will carry it through the winter.
Quick facts
- Sprouts in
- 14 days10 to 21
- Soil to sprout
- 80 °F70 to 90
- Start indoors
- 6 weeks before transplant4 to 8
- Life cycle
- Perennial, grown as an annual
- Seed to save
- About 120 days after planting100 to 150
- Height
- 8 ft4 to 12
- Spread
- 18 in12 to 24
- Support
- Grows better on a trellis or stake
- Cold
- Killed by frostdamaged below 32°F
- Heat
- Struggles above 100°F
- Self-sows
- Yes, expect volunteers
Full sun or part sun · medium water · consistently moist soil · 12 in apart (8 to 18) · direct sow or transplant or cuttings
When to plant
Nothing is open today. Spring indoor sowing opens 5 months, Feb 24 to Mar 13.
- Start indoors Feb 24 – Mar 13 Opens in 156 daysAbout 6 weeks before to 4 weeks before your last frost (Apr 10 here)Start indoors on a heat mat 4-6 weeks before the last frost - soaked seed, 80°F, and patience. Starting indoors is what makes this crop worthwhile in a short northern summer.
- Transplant Apr 24 – May 15 Opens in 215 daysAbout 2 weeks after to 5 weeks after your last frost (Apr 10 here)Do not rush it out. Wait until nights stay above 55-60°F; a plant set out into cold soil sits and sulks for a month and never catches up with one planted two weeks later.
Frost here: last around Apr 10 (Mar 27 to Apr 24 most years), first around Oct 25. Zone averages, your own yard may run a week or two either way.
Life stages
Five stages, about 9 weeks from sowing to the first pull. Windows are typical; your zone and weather move them.
Germination
Day 0 to 14 from sowing- DoNick and soak the seed before sowingMalabar seed has a hard shell and is famous for sitting in the ground doing nothing. Nick the coat with a nail file or sandpaper, soak 24 hours in warm water, then sow half an inch deep. Even prepared, expect 10-21 days - and longer if the soil is below 70°F.
- WaterKeep it warm and evenly moistevery 2 daysThis is a tropical plant and it germinates on heat: 75-85°F soil is ideal and below 65°F it may not come up at all. Indoors, use a heat mat. Outdoors, wait for genuinely warm soil rather than the calendar - a fortnight of patience beats a fortnight of cold, rotting seed.
Watch for- Seed sitting for weeks in cool soil (too early, not dead)
- Damping off in cold, wet ground
Seedling
Day 14 to 40 from sowing- ThinThin or space to about a foot apartOne plant covers a lot of trellis by August, so two or three are plenty for a household. Thin to 8-12 inches at the base of the support.
- SupportPut the trellis in now, before it needs itMalabar twines and will climb 6-10 feet in a hot summer. Set a trellis, netting, cattle panel or teepee at planting time; untangling a mature vine to add support later shreds the leaves you were going to eat.
- ProtectGuard young plants from slugsevery 4 daysThe thick succulent seedlings are exactly what slugs want. Once the vine is climbing it is largely out of reach, so the danger window is only the first few weeks.
Watch for- Seedlings sulking and refusing to grow until real heat arrives (normal)
- Slug damage on the lowest leaves
Climbing
Day 40 to 65 from sowing- PrunePinch the growing tip at about 18 inchesPinching the leader once the vine is a foot and a half tall forces side shoots low down, and side shoots are where the harvest comes from. An unpinched plant races for the top of the trellis on one bare stem and leaves you picking from a ladder.
- WaterWater steadily in heatevery 3 daysHeat tolerance is not drought tolerance. A dry Malabar plant makes small tough leaves and rushes into flower; a well-watered one stays leafy and tender all summer. Mulch and water deeply two or three times a week in hot weather.
- FertilizeFeed nitrogen for leavesevery 3 weeksThis is a leaf crop being cut repeatedly, so a light nitrogen feed (fish emulsion, compost tea) every two or three weeks keeps the new growth coming fast and tender.
Watch for- A single bare stem racing up the trellis (needs pinching)
- Small, tough, dark leaves from drought stress
- Spider mites in hot, dry, still air
Harvest
Day 50 to 80 to the first pull from sowing, picking to about day 150- HarvestCut 6-8 inch shoot tips every few daysHarvest like basil, not like lettuce: cut the top 6-8 inches of each shoot just above a leaf node, and two new shoots break from that node. The more often you cut, the more tender growth you get - a plant left uncut goes woody and flowers.
- PrunePinch out flower spikes to keep the leaves comingweeklyOnce the vine starts throwing small pink-white flower spikes it puts its energy into berries and the leaves get smaller. Pinch the spikes off as they appear if you want a longer leaf harvest - or let a few set if you want seed and volunteers.
- FertilizeFeed after a heavy cutA hard harvest is a hard pruning. A light liquid feed after cutting back a lot of growth gets the regrowth moving within days.
Watch for- Flower spikes forming (pinch, or accept smaller leaves)
- Purple berries dropping onto paving and staining it
- Leaves toughening in a dry spell
Flowering & berries
Day 100 to 180 from sowing- DoDecide about berries before they dropEach flower spike sets small hard berries that ripen glossy black-purple and burst into an intense magenta dye. Pick them for seed while firm, or strip the spikes off entirely - once they fall they stain paving and decking, and in zone 9 and warmer they seed a colony of volunteers.
- ProtectTake cuttings before frostFrost kills the plant outright. In late summer, snip a few 6-inch shoots, root them in a jar of water on the windowsill in about a week, and pot them up - you can carry the plant through winter indoors and never buy seed again.
Watch for- Berries staining hard surfaces
- First frost - the vine collapses overnight
- Volunteer seedlings next spring in warm zones
Harvest
- Vine has climbed 2-3 feet and started branching
- Leaves are thick, glossy and 3-5 inches across
- There are 6-8 inches of soft new growth at the shoot tips to cut
- About 50-70 days from sowing, and only once real heat has arrived
- Cut 6-8 inch shoot tips every few days
- Pinch out flower spikes to keep the leaves coming · weekly
- Feed after a heavy cut
Per plant 2 to 12.5 lbPicking cut and it regrows
Cook with Malabar Spinach
Watch out for
4 to know. None are high-risk for Malabar Spinach. 3 are active in September.
Slugs & SnailsSeverity Medium PestOnly a problem for the first few weeks.
The thick succulent seedlings are attractive to slugs, but once the vine is climbing the foliage is out of reach and the risk essentially ends - which is a good argument for setting out sturdy transplants rather than direct-sowing in a wet spring.
Irregular ragged holes chewed out of the middle of leaves and along the edges - not the clean-edged cuts a caterpillar leaves. Seedlings that vanish overnight, or that are cut off at soil level with nothing left behind. Silvery dried slime trails across leaves, soil, pots, and paving in the morning: this is the giveaway that tells you it was mollusks rather than an insect. Chewed pits in ripe fruit, especially where it rests on the ground. Damage that shows up on the lowest, dampest leaves first and gets worse after rain or evening watering. Turn over a board, an upturned pot, or a clump of dense mulch during the day and look for the animals themselves sheltering in the cool underneath.
Hand-picking works and costs nothing: go out an hour after dark with a headlamp, drop what you find into soapy water, and repeat nightly for a week or two - persistence is what wins, not any single product. Shallow beer traps sunk to soil level catch them too, but need emptying and refilling daily to be worth anything. Iron-phosphate bait is the standard control and is far lower-risk around pets and wildlife than the old metaldehyde products, but it is not harmless: many formulations include EDTA, and a dog that eats a quantity of pellets can develop iron toxicosis. Scatter it thinly per the label, never in piles, and keep dogs off a baited bed. Clear fallen foliage and debris in autumn, where the eggs are laid. In a wet climate this is a population you manage each season rather than one you eradicate - and on most established plants light grazing is cosmetic and needs nothing at all.
Take away the daytime shelter first: lift boards and upturned pots, clear piles of debris, keep dense mulch pulled back from crowns and stems, and give crowded plantings enough airflow to dry out. Water in the morning rather than the evening so the surface is dry by the time they come out. Copper tape around containers and raised beds gives them a shock they will not cross, and it is the one barrier that reliably works. Get plants past the vulnerable stage quickly - start seedlings in pots and set them out at a decent size rather than direct-sowing into a cold wet bed, since most plants stop being worth defending once the leaves toughen. Leave the ground beetles, frogs, toads, and ground-feeding birds alone, because they eat mollusks all night for free and broad-spectrum slug pellets kill them too. Where thick-leaved or resistant varieties exist for what you are growing, they take far less damage.
Slugs and snails are nocturnal mollusks that rasp ragged holes in soft leaves, shear off seedlings at ground level, and chew into ripe fruit that touches the soil. They feed at night and in the early morning and spend the day hidden under boards, pots, dense mulch, leaf litter, and low foliage, becoming active in exactly the cool, damp, shaded conditions that suit young plants. Damage is heaviest in wet spells and on tender spring growth: a single wet week can erase a row of seedlings while an established, tough-leaved plant of the same species is barely marked. They lay clusters of small pearly eggs in damp soil and under debris, so a garden with plenty of cover carries a resident population year after year rather than being invaded from outside.
AphidsSeverity Low PestnowThey gather on the soft growing tips - which is exactly the part you harvest, so the simplest control is to cut those tips, wash them well, and let the plant push clean new growth.
Rarely more than a nuisance on a vigorous vine.
Dense clusters of tiny insects packed onto shoot tips, flower buds, and the undersides of young leaves. Curled, cupped, or distorted new growth that never opens properly. A sticky shine on the leaves - and on whatever sits under the plant - that later goes black with sooty mold. Tiny white cast skins left behind where a colony has been feeding. Ants running steadily up and down the stems, which is often the first thing you notice. Mottled, streaked, or misshapen leaves that do not grow out can mean a virus the aphids brought with them rather than the feeding itself.
Knock the colonies off with a hard jet of water and repeat every few days - on most plants that alone ends it. Pinch out or prune off the worst-infested tips rather than treating the whole plant. If colonies keep rebuilding, spray insecticidal soap or horticultural oil directly onto the insects, covering leaf undersides, and repeat weekly until they are gone; treat early or late in the day, and never spray a wilted or heat-stressed plant. Avoid broad-spectrum insecticides - they kill the ladybugs, lacewings, and parasitic wasps that were about to solve the problem for you, and aphid numbers usually come back worse afterward. Anything you spray must be labeled for the plant you are treating; follow that label and observe its pre-harvest interval. On anything you eat, wash leaves, heads, and buds well before use, since aphids hide down in crowns, folds, and tight growth.
Go easy on nitrogen: the soft, lush growth that heavy feeding produces is exactly what aphids breed on. Check new growth once a week through spring and early summer so you catch colonies while they are still small, and rub the first few out with your fingers. Leave flowering plants nearby and skip broad-spectrum sprays - ladybugs, lacewings, hoverflies, and parasitic wasps do most of this work for free, and they only stay if there is something for them to eat. Keep ants off the plant where you can, since they protect aphids from those predators. Water steadily so plants are not stressed, and check any new plant over before you bring it home or move it indoors, since aphids usually arrive on something else.
Aphids are small soft-bodied sap-suckers - green, black, gray, pink, or waxy white, and mostly wingless - that gather in dense colonies on the tenderest new growth: shoot tips, buds, and the undersides of young leaves. They breed extremely fast in mild weather, so a few can become hundreds inside a week. Their feeding curls and distorts soft growth, and the sticky honeydew they excrete coats everything below and turns black with sooty mold. Ants often farm and defend the colonies for that honeydew. A few aphids are normal on almost any plant and a healthy plant shrugs them off; only dense, persistent colonies do real damage, and some aphids also spread plant viruses as they feed.
Malabar Spinach Leaf SpotSeverity Low DiseasenowVery common in humid Southern summers and almost never serious.
Harvest the tips, strip the worst of the lower leaves, and the plant carries on producing.
Round tan or grey spots a few millimetres across, often with a dark or purplish edge, on the oldest and lowest leaves first. Spots merging into larger dead patches on badly affected leaves, followed by yellowing and leaf drop low on the vine. Worst in the dense, humid interior of a thick, untrimmed canopy, and after a run of wet, still weather.
Pick off and remove the spotted leaves and clean up fallen foliage; keep harvesting from the clean growing tips, which is where the crop is anyway. Fungicide is not warranted on a home planting. If it recurs badly every year, the site is too crowded, too shaded, or too wet at the leaf - fix that rather than spraying.
Grow it up a support rather than letting it sprawl, so air moves through the canopy and leaves dry quickly. Water at the base rather than over the leaves, and water in the morning. Thin and harvest regularly - a vine cut back often simply does not hold enough old shaded foliage for the fungus to build in. Clear fallen infected leaves from under the plant rather than leaving them there.
A fungal leaf spot (usually a Cercospora species) that is the only disease most growers ever see on Malabar spinach. Small round tan-to-grey spots with darker margins appear on the older, lower, shaded leaves in warm humid weather, sometimes with a purple halo, and spread upward through the vine as the canopy thickens and stays wet. It is a cosmetic and sanitation problem rather than a threat to the plant: the vine keeps growing and producing clean new leaves at the tips throughout.
Spider MitesSeverity Low PestnowThe one pest that shows up on a plant that is otherwise thriving in heat, and always a sign the vine has gone dry or the air is still and dusty.
Hose the foliage down and fix the watering; on a plant you cut back constantly, shearing infested growth resets it to clean leaves.
Fine pale stippling or speckling across the upper leaf surface, as though the color had been sandblasted out of it, and later a dull bronze or rusty cast over the whole leaf. Delicate webbing across leaf joints, shoot tips, and undersides - that comes with a heavy infestation and means you caught it late. Leaves that dry, curl, and drop early while the plant looks thirsty no matter how much you water it. Hold a leaf over a sheet of white paper and tap it: the specks that fall and then start walking are mites. With a hand lens, look on the undersides for the mites themselves, pale or reddish, and their round translucent eggs. Damage that shows up first on the hottest, dustiest, most sheltered side of a plant, or on a pot sitting near a radiator indoors.
Start with water. A strong jet aimed at the leaf undersides, repeated every few days for a couple of weeks, knocks populations down and breaks the cycle - on many plants that alone ends it. On anything that regrows quickly, shearing back badly infested growth resets the plant to clean foliage. If it keeps building, spray insecticidal soap or horticultural oil directly onto the undersides where the mites actually live, and repeat every five to seven days for three rounds: contact sprays do not kill the eggs, so a single application always fails. Anything you spray must be labeled for the plant you are treating - follow the label and observe its pre-harvest interval on anything you eat. Predatory mites are an effective release in a greenhouse or on an indoor plant. Above all, correct the heat, dust, and drought stress that caused it, or the mites simply come back.
Do not let plants get drought-stressed - that is the single strongest trigger, and a plant watered steadily through heat is far less likely to have a mite problem at all. Hose the foliage down, undersides included, during hot dry spells: it knocks mites off, washes away the dust they thrive in, and raises the humidity around the plant for a while. Indoors and under cover, keep the air from going hot, dry, and stagnant, wipe or rinse the leaves occasionally, and keep pots away from radiators and heating vents. Inspect any plant carefully before you bring it indoors for winter or set it among others, since mites almost always arrive on something else. Avoid broad-spectrum insecticides: they wipe out the predatory mites, lacewings, and lady beetles that do most of this work for you, and reliably leave you with a worse outbreak than you started with.
Spider mites are not insects but tiny sap-feeding arachnids, smaller than a grain of salt, and you almost always notice the damage before you notice them. They live on the undersides of leaves and drain the cells one at a time, which is why the leaf goes finely stippled with pale dots before it bronzes and dries. They breed explosively in hot, dry, dusty, still air - a generation can pass in a week at high temperature - so a barely visible population becomes a webbed, bronzed plant within a fortnight. Drought-stressed plants and plants wintered indoors in dry heated air are the classic hosts. Broad-spectrum insecticides make matters worse rather than better, because they kill the predatory mites and lady beetles that normally hold mites in check.
Good & bad neighbors
Plant nearby
-
Two heat-loving crops on the same calendar - okra takes the summer heat that stops everything else, and both hit their stride at the same time.
- Traditional pairings, thin evidence
-
Shares the heat, the water and the harvest habit - both are cut for tender tips all summer, so they end up in the same bed and the same trip out with scissors.
-
A nitrogen-fixing legume that thrives in the same heat and can share the base of the trellis, feeding a hungry leaf crop a little as it goes.
-
Sweet potato vines make a living mulch at the foot of the trellis, shading the soil and holding moisture for Malabar's shallow feeding roots while it climbs above.

Keep apart
- Traditional pairings, thin evidence
-
Not an antagonism, just a practical clash - both are vigorous climbers, and on one trellis Malabar smothers the cucumber and makes both harder to pick. Give them separate supports.

Varieties · 2
You pick one when you add Malabar Spinach to your garden. Its days to maturity set your harvest window.
Green Stem (Basella alba)
Green stems and broad, thick, glossy mid-green leaves on a twining vine.
green-stemvigorouslarge-leafThe standard green-stemmed form and the one usually sold as Ceylon or vine spinach: green stems, large thick heart-shaped leaves, and slightly faster, heavier growth than the red form. The better choice if you are growing purely for the kitchen.
Red Stem ('Rubra')
Deep magenta-red stems and leaf veins against dark green, glossy, thick leaves.
red-stemornamentalslowerThe ornamental form, often sold as Basella rubra though it is the same species: vivid magenta stems and leaf veins that look striking on an arch, fence or obelisk. A little slower and slightly smaller-leaved than the green form, and it bleeds pink into pale dishes when cooked. Grow it where the trellis is on display.
Grower tips
Notes from growers, tagged with the zone they grow in. A person reads every post before it appears.
Nobody has posted about Malabar Spinach yet. The first one usually saves someone a season.
Free account. Your post shows your grower name and zone, never your email.