
Add it to your home screen and it opens full screen: no browser bars, one tap away, and everything stays signed in. Free, nothing to download from an app store.
- Tap the Share button in your browser
- Scroll down and choose “Add to Home Screen”
- Open GrowSomeFood from your home screen
- Open your browser’s menu
- Choose “Add to Home screen” or “Install app”
- Open GrowSomeFood from your home screen

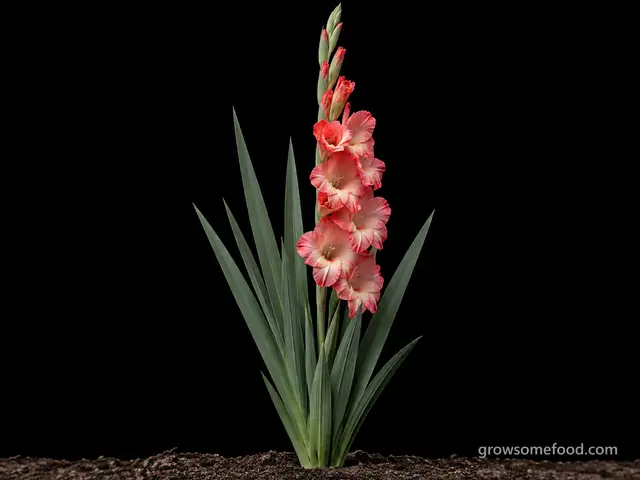
Gladiolus
The tall, dramatic cut flower of summer: sword-leaved spikes lined with ruffled florets that open bottom-to-top. Plant corms in succession for months of bloom, stake them, and dig the tender corms to store in cold zones.
Safety notes Gladiolus corms and foliage are mildly toxic if eaten, causing stomach upset, and the sap can irritate skin - wear gloves if you're sensitive and keep corms out of the kitchen and away from children and pets. Considered toxic to cats, dogs, and horses. Not a food plant.
Overview
Gladiolus - 'glads' - are the towering, old-fashioned cut flowers of high summer: sword-shaped leaves (the name comes from the Latin gladius, 'sword') and tall spikes, 2-5 feet, lined with ruffled florets in nearly every color, opening from the bottom up over a week. Grown from a corm planted in spring, they're prized above all as a cut flower, a staple of summer bouquets and county-fair arrangements.
The one thing to knowGrown from a corm planted in spring, they're prized above all as a cut flower, a staple of summer bouquets and county-fair arrangements.
Quick facts
- Height
- 48 inRange: 24–72 in
- Spread
- 10 inRange: 6–12 in
- Support
- Grows better on a trellis or stake
- Cold
- Killed by frostdamaged below 32°F
- Heat
- Struggles above 95°F
- Life cycle
- Grown as an annualBotanically a perennial
- Soil
- Well-drained
- Water
- Medium
- Plant spacing
- 6 inRange: 4–8 in
When to plant
Nothing is open today. Spring planting opens 6 months, Apr 10 to Jun 5.
- Plant tubers Apr 10 – Jun 5 Opens in 173 daysAbout at to 8 weeks after your last frost (Apr 10 here)Plant after all danger of frost, once the soil has warmed, then a fresh batch every 2 weeks until early July for continuous bloom all summer (the classic glad succession trick). In zones 2-7 corms are dug and stored each fall.
Frost here: last around Apr 10 (Mar 27 to Apr 24 most years), first around Oct 25. Zone averages, your own yard may run a week or two either way.
Life stages
From the first start to harvest
Follow the growing sequence. Choose a stage to see its care and signs to watch for.
Stage 1 of 4 · The growing sequence
Sprouting from the corm
Day 0 to 20 from planting
Care at this stage
-
Plant 4-6 inches deep and set a stake
Plant corms pointy-end-up 4-6 inches deep (deeper planting helps anchor the tall spikes) and 4-6 inches apart in warm soil after frost. Push in a stake or set flower rings now, so you don't spear the corm later - the tall spikes always need support.
-
Water in and keep evenly moist
Water at planting and keep the soil evenly moist as the corm roots and sprouts; glads want steady moisture through their whole short season.
Stages can overlap; weather, variety, and growing conditions change the pace.
Harvest
- Lowest one or two florets on the spike just opening (the rest open in sequence up the stalk)
- Cut in the cool morning, leaving at least 4 leaves on the plant to feed the corm
- Cut the spike when the bottom 1-2 florets open · every 3 days
- Keep the heavy spikes upright
Per plant 1 to 2 spikesPicking pull onceFirst crop 1 yrs
Watch out for
4 to know. 1 is high-risk: Thrips. 1 is active in October.
ThripsSeverity High PestSeason: Jun–SepSilvery-white streaks and fine speckling on leaves and petals, brown discolored patches, distorted buds and blooms that fail to open properly, and tiny sliver-like insects that drop out when you shake foliage or a flower over a sheet of white paper.
Thrips are the number-one gladiolus pest, and the gladiolus thrips in particular: it overwinters on the stored corms and re-infests the planting every year, so foliage sprays alone never end it. The durable fix is treating the corms at lifting and again before replanting - a hot-water dip or a dusting - and buying fresh clean corms if infestation is chronic. Scout before bloom; once the florets are streaked and browned the spike is already spoiled.
Silvery-white streaks and fine speckling on leaves and petals, brown discolored patches, distorted buds and blooms that fail to open properly, and tiny sliver-like insects that drop out when you shake foliage or a flower over a sheet of white paper. Worst in hot, dry spells and on drought-stressed plants.
A strong water spray dislodges light infestations, and on a plant that can take it a hard shear and clean regrowth clears them outright. For heavier pressure use insecticidal soap, neem or spinosad, aimed down into the leaf sheaths and buds where thrips actually shelter, and repeat at intervals since eggs and pupae escape a single spray. Spinosad is a registered insecticide: use only a product labeled for the crop you are treating, follow the label exactly, and observe its pre-harvest interval.
Scout early, before the damage reaches the part of the plant you care about. Start with clean planting stock, keep plants well watered since drought-stressed plants suffer worst, avoid heavy nitrogen, clear weedy hosts nearby, and hang blue or yellow sticky traps to catch the first arrivals. Reflective mulch deters them, and predatory mites, lacewings and minute pirate bugs do real work outdoors.
Tiny slender sap-sucking insects that rasp at leaves, buds and petals and drink what runs out, leaving silvery-white streaking and fine flecking, brown scorched patches, and new growth that comes out twisted or fails to open. They breed fast in hot, dry weather, shelter deep in leaf sheaths, folds and unopened buds where sprays struggle to reach, and several species also transmit plant viruses - which is often more damaging than the feeding itself.
Gray Mold (Botrytis)Severity Medium DiseasenowSeason: Jul–OctBrowned, collapsed flowers and buds; soft, water-soaked brown patches on leaves, stems or fruit; and a dusty gray-brown fuzz over the dead tissue.
Botrytis spots gladiolus florets in humid weather and also causes the brown-to-black corm rot that loses stored corms over winter. Cure corms well, store them cool, dry and airy, and discard any that are damaged or soft.
Browned, collapsed flowers and buds; soft, water-soaked brown patches on leaves, stems or fruit; and a dusty gray-brown fuzz over the dead tissue. Rot jumping between two pieces of fruit or two petals that touch is the signature, and it often shows up again in the fridge or the storage box days later.
Cut out and destroy infected tissue as soon as it appears, and bag it rather than composting it. Harvest ahead of a prolonged wet spell and store the crop dry and cold. Protective fungicides help through long damp weather, but airflow and sanitation do most of the work.
Space and prune for airflow, water at the base rather than over the top, and go easy on nitrogen, which produces the soft growth it prefers. Clear dead leaves, spent flowers and rotting fruit at every pass, since that debris is where it overwinters. Handle fruit, buds and bulbs gently, because it enters through bruises, and cure and store anything you keep dry and well ventilated.
Botrytis cinerea and its relatives - the fuzzy gray-brown mold of cool, wet, humid weather. It blights flowers and buds, rots ripening fruit, and moves into soft, aging, bruised or frost-damaged tissue through the smallest wound, coating whatever it kills in dusty gray spores. It overwinters on dead plant debris, spreads on air currents and by direct contact between touching tissue, and keeps working after harvest, which is why it also ruins fruit and bulbs in storage.
AphidsSeverity Low PestSeason: May–JulDense clusters of tiny insects packed onto shoot tips, flower buds, and the undersides of young leaves.
Aphids can spread virus between glads, which is the main reason to keep colonies down; as a pest they are minor here compared with thrips.
Dense clusters of tiny insects packed onto shoot tips, flower buds, and the undersides of young leaves. Curled, cupped, or distorted new growth that never opens properly. A sticky shine on the leaves - and on whatever sits under the plant - that later goes black with sooty mold. Tiny white cast skins left behind where a colony has been feeding. Ants running steadily up and down the stems, which is often the first thing you notice. Mottled, streaked, or misshapen leaves that do not grow out can mean a virus the aphids brought with them rather than the feeding itself.
Knock the colonies off with a hard jet of water and repeat every few days - on most plants that alone ends it. Pinch out or prune off the worst-infested tips rather than treating the whole plant. If colonies keep rebuilding, spray insecticidal soap or horticultural oil directly onto the insects, covering leaf undersides, and repeat weekly until they are gone; treat early or late in the day, and never spray a wilted or heat-stressed plant. Avoid broad-spectrum insecticides - they kill the ladybugs, lacewings, and parasitic wasps that were about to solve the problem for you, and aphid numbers usually come back worse afterward. Anything you spray must be labeled for the plant you are treating; follow that label and observe its pre-harvest interval. On anything you eat, wash leaves, heads, and buds well before use, since aphids hide down in crowns, folds, and tight growth.
Go easy on nitrogen: the soft, lush growth that heavy feeding produces is exactly what aphids breed on. Check new growth once a week through spring and early summer so you catch colonies while they are still small, and rub the first few out with your fingers. Leave flowering plants nearby and skip broad-spectrum sprays - ladybugs, lacewings, hoverflies, and parasitic wasps do most of this work for free, and they only stay if there is something for them to eat. Keep ants off the plant where you can, since they protect aphids from those predators. Water steadily so plants are not stressed, and check any new plant over before you bring it home or move it indoors, since aphids usually arrive on something else.
Aphids are small soft-bodied sap-suckers - green, black, gray, pink, or waxy white, and mostly wingless - that gather in dense colonies on the tenderest new growth: shoot tips, buds, and the undersides of young leaves. They breed extremely fast in mild weather, so a few can become hundreds inside a week. Their feeding curls and distorts soft growth, and the sticky honeydew they excrete coats everything below and turns black with sooty mold. Ants often farm and defend the colonies for that honeydew. A few aphids are normal on almost any plant and a healthy plant shrugs them off; only dense, persistent colonies do real damage, and some aphids also spread plant viruses as they feed.
Spider MitesSeverity Low PestSeason: Jul–AugFine pale stippling or speckling across the upper leaf surface, as though the color had been sandblasted out of it, and later a dull bronze or rusty cast over the whole leaf.
They stipple and bronze the sword leaves in hot, dry weather. Keep the planting watered through heat and hose the foliage down.
Fine pale stippling or speckling across the upper leaf surface, as though the color had been sandblasted out of it, and later a dull bronze or rusty cast over the whole leaf. Delicate webbing across leaf joints, shoot tips, and undersides - that comes with a heavy infestation and means you caught it late. Leaves that dry, curl, and drop early while the plant looks thirsty no matter how much you water it. Hold a leaf over a sheet of white paper and tap it: the specks that fall and then start walking are mites. With a hand lens, look on the undersides for the mites themselves, pale or reddish, and their round translucent eggs. Damage that shows up first on the hottest, dustiest, most sheltered side of a plant, or on a pot sitting near a radiator indoors.
Start with water. A strong jet aimed at the leaf undersides, repeated every few days for a couple of weeks, knocks populations down and breaks the cycle - on many plants that alone ends it. On anything that regrows quickly, shearing back badly infested growth resets the plant to clean foliage. If it keeps building, spray insecticidal soap or horticultural oil directly onto the undersides where the mites actually live, and repeat every five to seven days for three rounds: contact sprays do not kill the eggs, so a single application always fails. Anything you spray must be labeled for the plant you are treating - follow the label and observe its pre-harvest interval on anything you eat. Predatory mites are an effective release in a greenhouse or on an indoor plant. Above all, correct the heat, dust, and drought stress that caused it, or the mites simply come back.
Do not let plants get drought-stressed - that is the single strongest trigger, and a plant watered steadily through heat is far less likely to have a mite problem at all. Hose the foliage down, undersides included, during hot dry spells: it knocks mites off, washes away the dust they thrive in, and raises the humidity around the plant for a while. Indoors and under cover, keep the air from going hot, dry, and stagnant, wipe or rinse the leaves occasionally, and keep pots away from radiators and heating vents. Inspect any plant carefully before you bring it indoors for winter or set it among others, since mites almost always arrive on something else. Avoid broad-spectrum insecticides: they wipe out the predatory mites, lacewings, and lady beetles that do most of this work for you, and reliably leave you with a worse outbreak than you started with.
Spider mites are not insects but tiny sap-feeding arachnids, smaller than a grain of salt, and you almost always notice the damage before you notice them. They live on the undersides of leaves and drain the cells one at a time, which is why the leaf goes finely stippled with pale dots before it bronzes and dries. They breed explosively in hot, dry, dusty, still air - a generation can pass in a week at high temperature - so a barely visible population becomes a webbed, bronzed plant within a fortnight. Drought-stressed plants and plants wintered indoors in dry heated air are the classic hosts. Broad-spectrum insecticides make matters worse rather than better, because they kill the predatory mites and lady beetles that normally hold mites in check.
Good & bad neighbors
Plant nearby
-
Bushy zinnias fill in around the bare-legged glad spikes and share the sun, warmth, and cut-and-come-again cutting-garden role.
- Traditional pairings, thin evidence
-
Airy cosmos softens the stiff upright glads and shares full sun; a classic filler in the cutting garden.
-
Both tender summer tubers/corms planted after frost and dug to store; the round dahlia forms contrast the vertical glad spikes in the cutting bed.
-
A traditional bedding partner said to help deter some soil pests; both sun-loving and easy alongside glads.
-
Shares full sun and warm well-drained soil, draws the pollinators glads don't, and its blue spikes complement the glad colors.

Varieties · 9
You pick one when you add Gladiolus to your garden. Its days to maturity set your harvest window.
Traderhorn
A classic large-flowered grandiflora glad: brilliant fire-engine red florets with white flashes in the throat, on tall strong spikes.
Variety details for Traderhorn
Tall spikes of vivid scarlet-red ruffled florets with white throat markings.
grandifloraredlarge-floweredclassicA bold, dependable, old-favorite cut flower and one of the most popular reds.
Priscilla
A beloved bicolor grandiflora: ruffled ivory-white florets edged in soft pink with a creamy-yellow throat, on tall elegant spikes.
Variety details for Priscilla
White ruffled florets brushed with pink edges and a yellow throat.
grandiflorabicolorwhite-pinkruffledA romantic, popular cut-flower variety.
Green Star
A striking pure lime-green glad: unusual clear chartreuse-green florets on tall spikes, a favorite for modern arrangements and a standout in the cutting garden where green flowers are prized.
Variety details for Green Star
Tall spikes of clear, unmarked lime-green ruffled florets.
grandifloragreennoveltycut-flowerAtom
A charming miniature/small-flowered glad: bright scarlet-red florets crisply outlined in a thin white picotee edge, on shorter, daintier spikes than the giant grandifloras.
Variety details for Atom
Small scarlet florets each rimmed with a fine white edge, on shorter spikes.
miniatureredwhite-edgesmall-floweredExcellent for smaller arrangements and gardens.
Nanus (Hardy Dwarf)
The hardy dwarf glads (Gladiolus nanus and hybrids like 'Nymph' and 'Prins Claus'): shorter (18-24 inch), earlier-blooming, more graceful and open-flowered than the big grandifloras, and notably HARDIER - they can overwinter in the ground down to about zone 5 with mulch, unlike tender grandifloras.
Variety details for Nanus (Hardy Dwarf)
Shorter, airy spikes of loosely spaced flowers, often white or pink with contrasting blotches.
nanusdwarfearlyhardierThe choice for a perennial glad in colder zones.
Black Star
A dramatic deep purple-red glad so dark it reads nearly black, on tall grandiflora spikes - a sought-after moody color for arrangements and bold border accents.
Variety details for Black Star
Tall spikes of very deep velvety purple-maroon florets.
grandifloradeep-purpledramaticcut-flower
Grower tips
Notes from growers, tagged with the zone they grow in. A person reads every post before it appears.
Nobody has posted about Gladiolus yet. The first one usually saves someone a season.
Free account. Your post shows your grower name and zone, never your email.