
Add it to your home screen and it opens full screen: no browser bars, one tap away, and everything stays signed in. Free, nothing to download from an app store.
- Tap the Share button in your browser
- Scroll down and choose “Add to Home Screen”
- Open GrowSomeFood from your home screen
- Open your browser’s menu
- Choose “Add to Home screen” or “Install app”
- Open GrowSomeFood from your home screen

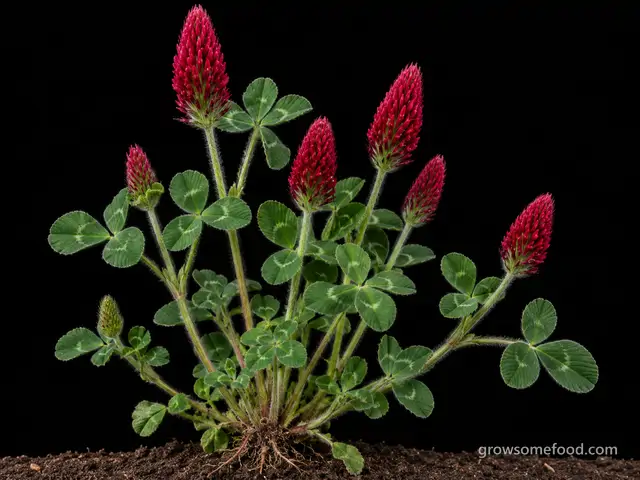
Crimson Clover
The most beautiful cover crop there is, and a soil-building workhorse: a nitrogen-fixing annual legume, usually fall-sown, that holds and improves the soil over winter, feeds bees with brilliant crimson flowers in spring, and is tilled in for a rich shot of free nitrogen.
Safety notes Crimson clover is grown to build the soil, not for the table. Fresh young flower heads are edible in small amounts as a mild garnish, but old, dry, over-mature heads develop hair-like fibers - don't eat those. A forage caution shared with all clovers: livestock should not graze clover heavily when it is mold-damaged or in bloat-risk conditions, and those same fibrous over-mature heads occasionally cause problems for grazing animals. Neither point affects its use as a cover crop.
Overview
Crimson clover is grown not for a harvest but for the soil - and it may be the loveliest way there is to build it. A fast, soft-leaved annual legume, it's one of the great cover crops and green manures: like all legumes it partners with soil bacteria to fix nitrogen from the air, storing it in root nodules and lush growth that, when tilled in, feeds the next crop with free fertilizer. It also blankets bare ground against erosion, smothers weeds, and adds organic matter.
The one thing to knowCrimson clover is grown not for a harvest but for the soil - and it may be the loveliest way there is to build it.
Quick facts
- Sprouts in
- 8 daysRange: 5–14 days
- Soil temperature
- 60 °FRange: 45–75 °F
- Height
- 18 inRange: 12–30 in
- Spread
- 6 inRange: 4–10 in
- Cold
- Takes light frostdamaged below 0°F
- Heat
- Struggles above 90°F
- Life cycle
- Annual
- Save seeds
- About 240 days after plantingRange: 180–300 days
- Self-sows
- Yes, expect volunteers
- Soil
- Well-drained
- Water
- Medium
- Plant spacing
- 3 inRange: 1–6 in
When to plant
Nothing is open today. Summer sowing opens 10 months, Aug 11 to Sep 10.
- Direct sow Aug 11 – Sep 10 Opens in 296 daysAbout 11 weeks before to 6 weeks before your first frost (Oct 25 here)A late-summer sowing after an early crop comes out, to establish a fall cover; time it so the clover establishes well before cold, then overwinters (mild zones) or is grown as a fall cover.
- Direct sow Aug 26 – Sep 30 Opens in 311 daysAbout 9 weeks before to 4 weeks before your first frost (Oct 25 here)THE main use: sow in fall (6-8 weeks before hard frost) as a winter-annual cover crop that establishes, overwinters, surges in spring, and is terminated at bloom for a big shot of nitrogen before summer crops go in. Hardy to about 0-10F, so best in zones 6 and warmer.
Frost here: last around Apr 10 (Mar 27 to Apr 24 most years), first around Oct 25. Zone averages, your own yard may run a week or two either way.
Life stages
From the first start to harvest
Follow the growing sequence. Choose a stage to see its care and signs to watch for.
Stage 1 of 5 · The growing sequence
Germination
Day 0 to 8 from sowing
Care at this stage
-
Sow into a moist bed for even germination
Broadcast the seed onto a firm, moist seedbed and rake it in lightly (about a quarter inch) - crimson clover is small-seeded and needs good soil contact and moisture to establish. Fall sowing into cooling, moist soil is ideal.
-
Inoculate the seed for nitrogen fixation
For its full nitrogen-fixing benefit, use seed pre-inoculated with (or add) the correct clover/rhizobium bacteria, so the roots form the nodules that pull nitrogen from the air. Most bought seed is pre-inoculated.
Stages can overlap; weather, variety, and growing conditions change the pace.
Watch out for
4 to know. None are high-risk for Crimson Clover. 1 is active in October.
Crown RotSeverity Medium DiseaseSeason: Nov–FebA plant that fails to green up or emerge in spring when everything around it does - the most common way this gets discovered, and by then it is already too late.
Wet, heavy, poorly drained soil is the main way to lose a crimson clover cover - it wants moist but well-drained ground, not waterlogging, and Sclerotinia is among the fungi involved. Do not sow too thickly, and rotate; a thinned stand can sometimes be over-seeded.
A plant that fails to green up or emerge in spring when everything around it does - the most common way this gets discovered, and by then it is already too late. Stems that wilt, blacken, and collapse in wet weather while the soil is clearly damp rather than dry. A crown that is soft, dark, brown, or mushy when you press or lift it, sometimes with a foul smell, instead of firm and pale. New growth that pulls away from the crown with almost no resistance. Clumps browning and going hollow in the middle while the outer growth stays alive. In stands and cover crops, patches wilting, yellowing, and thinning out after wet spells or over a mild wet winter.
There is usually no cure once the crown itself has rotted: the plant is lost, and the job is to save what you can and fix the site. Lift it, cut away every soft, dark, rotted part with a clean blade back to firm tissue, and replant only healthy divisions or firm outer growth into fresh, sharply drained soil or medium. On potted and specialist plants, repotting into fresh airy medium and keeping them drier with better airflow gives the best chance, though a badly rotted crown is usually beyond saving. Bin the rotted material rather than composting it. Replant somewhere better drained rather than back into the same wet spot - or start again from seed, cuttings, or self-sown seedlings, which is the realistic option for anything that resents being moved at all.
Drainage and airflow at the crown are everything. Match the plant to the site first: a dry-adapted perennial planted in heavy or enriched ground is on borrowed time whatever else you do. In wet or clay soil, plant on a slope, berm, raised bed, or gritty rock-garden site so water drains away from the crown rather than standing over it. Set plants at the right depth - never bury the crown - and keep mulch, dead leaves, and debris pulled back from it rather than piled against it, since damp material resting on the crown is a common trigger. Do not overwater, and ease right off during dormancy, when a resting plant wants to be barely damp rather than wet. Give crowded plantings enough space and airflow to dry out, and do not sow a stand too thickly. In cold, wet climates, divide in spring rather than fall, so plants are not recovering from surgery through the wettest months.
Crown rot is the rotting of a plant at the crown - the growing point where the stems meet the roots, right at or just below soil level. Soil fungi and water molds that live in most ground attack that tissue whenever it sits wet, cold, and airless, and because the crown is the one part a perennial cannot regrow from, losing it usually means losing the plant. It is above all a winter problem: a plant that survives hard frost perfectly well in dry ground rots out in a wet one, and the classic story is a perennial that simply never comes back in spring. Dry-adapted plants growing in heavy or over-improved soil are the most vulnerable, along with anything that has mulch, wet leaves, or piled debris sitting against the crown, and anything planted too deep.
Damping-OffSeverity Low DiseasenowSeason: Sep–NovSeedlings that fail to emerge or collapse at the soil line soon after germinating, and thin, patchy establishment in cold wet conditions.
An establishment-stage problem in cold wet soil - sowing into a warm, moist, well-drained bed at the right time avoids it.
Seedlings that fail to emerge or collapse at the soil line soon after germinating, and thin, patchy establishment in cold wet conditions.
None for affected seedlings; reduce watering, improve drainage and airflow, and resow more thinly if needed.
Sow into warm-enough, well-drained, moist (not soggy) soil with good seed-to-soil contact, and don't sow too deep or too early into cold ground.
A seedling rot that collapses young desert marigold seedlings sown too thickly or kept too wet in cool conditions - a minor issue easily avoided by lean, well-drained sowing and careful watering.
Clover Root CurculioSeverity Low PestSeason: Apr–JunCrescent-shaped notches chewed along leaf edges by adults, and weakened, poorly nodulated plants from larval root feeding.
A minor pest of clover stands; because crimson clover is a short-lived cover terminated at bloom, curculio seldom causes real harm.
Crescent-shaped notches chewed along leaf edges by adults, and weakened, poorly nodulated plants from larval root feeding.
Rarely warranted in a cover crop - rotation and timely termination are enough; the stand is turned in before damage matters.
Rotate clover plantings, maintain vigorous stands, and terminate on schedule so pests don't build up; healthy fall covers usually outpace the damage.
A small weevil whose larvae feed on clover roots and nitrogen nodules and whose adults notch the leaf margins, occasionally weakening stands, though rarely a serious problem in a fall-terminated cover crop.
Pea AphidSeverity Low PestSeason: Apr–JunColonies of large pale-green aphids packed onto shoot tips, tendrils, and flower stalks, thickest on the softest new growth.
Seldom a real problem, since crimson clover attracts abundant aphid predators - it's more often part of the pest solution than a victim.
Colonies of large pale-green aphids packed onto shoot tips, tendrils, and flower stalks, thickest on the softest new growth. Aphids dropping off the plant the moment you brush against it - a habit fairly specific to this species. Sticky honeydew on the foliage below, ants running the stems, and white cast skins where a colony has been. Yellowing, stunting, downward-rolled leaves, or a mottled stand that does not grow away, which points to a virus the aphids brought rather than the feeding itself.
On a cover crop, usually nothing at all - the predators arrive and the stand outgrows it. Knock heavy colonies off with a jet of water, or pinch out and remove the worst-infested tips. Insecticidal soap sprayed directly onto the insects works if a stand is genuinely being checked, but it also hits the beneficials, so keep it to spot treatment. Never spray a stand you intend to pick shoots or flowers from without checking the product label for that use and its pre-harvest interval.
Encourage the beneficial insects that legume flowers already draw, and skip broad-spectrum sprays that remove them. Do not over-feed nitrogen, since soft lush growth is what the colonies build on - and a legume should not be getting nitrogen anyway. Check the growing tips weekly through spring, and rub out the first colonies by hand while they are small. Where virus has been a recurring problem in a legume rotation, avoid planting a new stand immediately downwind of an old one, since that is how the winged aphids move.
The pea aphid is a large, long-legged, pale-green aphid that specializes on legumes - peas, vetch, clover, alfalfa, lentil, faba bean - and colonizes the growing tips, tendrils, flower stalks, and developing pods. It builds fastest in the mild weather of spring, when a handful of overwintered females can become a coating within two weeks, and it drops off the plant readily when disturbed. On a vigorous cover-crop stand the feeding itself is usually cosmetic and is held in check by the ladybugs, lacewings, hoverflies, and parasitic wasps that legume flowers attract. What matters more is that it transmits viruses between legumes, including pea enation mosaic and bean leafroll, which stunt and yellow a stand out of all proportion to the number of insects present.
Good & bad neighbors
Plant nearby
-
A classic cover-crop mix: fall-sown crimson clover fixes nitrogen while cereal rye provides bulk, weed suppression, and erosion control - the grass balances the clover's nitrogen with carbon and the two make a superb combined green manure.
-
Terminated at bloom, crimson clover leaves a big shot of nitrogen and organic matter perfect for the heavy-feeding crops that follow it - corn, tomatoes, squash, and brassicas all benefit from following a crimson clover cover.
-
Oats make a fast 'nurse crop' for crimson clover, establishing quickly and shading out weeds while the clover gets going beneath; in cold zones the oats winter-kill and release the clover cover.
-
Crimson clover is traditionally undersown into or rotated with small grains like wheat, feeding the nitrogen-hungry grain and establishing a nitrogen cover to follow the harvest - a well-supported grain-legume pairing.

Varieties · 3
You pick one when you add Crimson Clover to your garden. Its days to maturity set your harvest window.
Dixie Crimson Clover
The classic reseeding crimson clover selected for the South, sold both as 'Dixie' and as 'Dixie Reseeding' - the same cultivar under two names.
Variety details for Dixie Crimson Clover
Dense soft-leaved stands topped by brilliant elongated crimson-red flower heads that return each cool season.
cover-cropreseedingself-perpetuatingsouthern-adaptedIt sets hard seed and returns on its own, making it the choice for a self-perpetuating living cover in orchards, vineyards, pastures, and paths. Vigorous, nitrogen-rich, excellent for pollinators, and well adapted to mild-winter fall sowing with little re-sowing needed.
Kentucky Pride / Common Crimson Clover
The standard general-purpose crimson clover grown as a fall or spring cover crop and green manure across a wide range - dependable, quick to establish, nitrogen-rich, and a fine bee plant.
Variety details for Kentucky Pride / Common Crimson Clover
Vigorous soft-hairy foliage with the signature deep-crimson conical flower heads.
cover-cropgreen-manurenitrogen-fixerpollinatorThe all-purpose choice for soil-building and pollinators.
AU improved reseeding types
A group, not a single cultivar: Auburn University's improved reseeding crimson clovers, of which AU Robin and AU Sunrise are two distinct releases you buy by name.
Variety details for AU improved reseeding types
Improved reseeding stands with strong crimson bloom and dependable return.
cover-cropreseedingearlyimprovedAll were selected for earlier maturity, better reseeding, and disease tolerance in the South - refined choices for reliable self-perpetuating covers and forage in mild-winter regions.
Grower tips
Notes from growers, tagged with the zone they grow in. A person reads every post before it appears.
Nobody has posted about Crimson Clover yet. The first one usually saves someone a season.
Free account. Your post shows your grower name and zone, never your email.