Add it to your home screen and it opens full screen: no browser bars, one tap away, and everything stays signed in. Free, nothing to download from an app store.
- Tap the Share button in your browser
- Scroll down and choose “Add to Home Screen”
- Open GrowSomeFood from your home screen
- Open your browser’s menu
- Choose “Add to Home screen” or “Install app”
- Open GrowSomeFood from your home screen
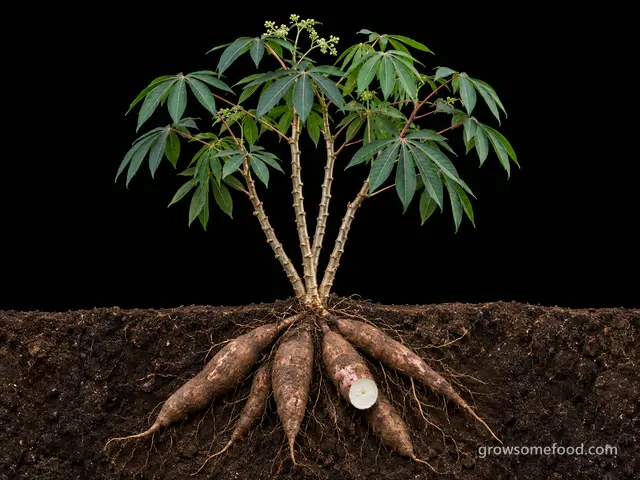
Cassava
The tropical staple root behind yuca fries and tapioca - grown from a stem cutting, tough as nails, and the one common food crop that is genuinely dangerous until it is processed correctly.
Cassava is NEVER safe raw. Every part carries cyanogenic glycosides that release hydrogen cyanide; the peel and the fibrous core hold the most. Always peel completely, cut out the core, slice or grate, soak or ferment, then boil until soft through and discard the water. Bitter varieties need the full grate-soak-ferment treatment and have killed people when skipped. Leaves must be boiled 15-20 minutes. If any piece tastes bitter or numbs your mouth, spit it out and discard the whole root.
Overview
The one thing to knowEvery part of a cassava plant contains cyanogenic glycosides - compounds that release hydrogen cyanide when the tissue is crushed or chewed.
Cassava is a woody tropical shrub grown for the thick starchy storage roots that swell at its base - the yuca of Latin American kitchens, the manioc and gari of West Africa, and the source of tapioca. It feeds close to a billion people, thrives in poor soil and long droughts, and asks very little of the gardener: push a foot-long piece of last year's stem into warm ground and come back eight to twelve months later to dig.
It also carries a hazard no other common food plant in this catalog carries. Every part of a cassava plant contains cyanogenic glycosides - compounds that release hydrogen cyanide when the tissue is crushed or chewed. Traditional processing (peeling, coring, grating or slicing, soaking or fermenting, then thorough cooking) removes them, and billions of meals a year are made safely this way. Skipping it is not a matter of taste: undercooked bitter cassava has caused mass poisonings and a permanent paralysis called konzo. Grow cassava if you will respect the processing. It is not a crop to nibble in the garden.
In the United States it is a real crop only where frost does not reach - south Florida, the Gulf coast, south Texas, Hawaii, and warm coastal southern California - because the roots need most of a year to bulk.
Quick facts
- Life cycle
- Perennial, grown as an annual
- Height
- 8 ft5 to 12
- Spread
- 4 ft3 to 6
- Cold
- Killed by frostdamaged below 32°F
- Heat
- Struggles above 105°F
Full sun · medium water · well-drained soil · 3.5 ft apart (3 to 4) · cuttings
When to plant
No planting window on record for this zone. Nearest zone with one: 8a.
Frost here: last around Apr 10 (Mar 27 to Apr 24 most years), first around Oct 25. Zone averages, your own yard may run a week or two either way.
Life stages
Four stages, about 9 months from planting to the first pull. Windows are typical; your zone and weather move them.
Sprouting from the stake
Day 0 to 30 from planting- WaterKeep the ground moist while the stake sproutsevery 3 daysA cassava stake has no roots yet, so the first month is the only time it truly needs water. Keep the soil evenly moist - never soggy - until shoots are up and growing.
- ProtectPlant right way up, into warm soilBuds point upward; a stake planted upside down sprouts poorly or not at all. Wait for warm soil and settled frost-free weather - stakes rot in cold, wet ground.
Watch for- Stakes that blacken and go soft (soil too cold or too wet)
- No shoots after 4-5 weeks (immature, dried-out, or inverted stakes)
Canopy building
Day 35 to 120 from planting- WeedWeed hard for the first three monthsevery 2 weeksYoung cassava grows slowly and loses badly to weeds. Keep the bed clean until the canopy closes; after that the shrub shades out most competition itself. Keep the hoe shallow and away from the crown.
- FertilizeGo easy on nitrogenHeavy nitrogen grows a handsome leafy shrub and disappointing roots. If you feed at all, use a balanced or potassium-leaning fertilizer once or twice in the first half of the season, then stop.
- WaterWater through dry spells, never let it sit wetevery 10 daysCassava is famously drought-tolerant, but steady moderate moisture grows a better crop. Waterlogging is the single most common way home growers lose the harvest.
Watch for- Weeds outrunning the young plants
- Spider mite stippling and bronzing in hot dry weather
- Angular water-soaked leaf spots and gumming stems (bacterial blight)
Root bulking
Day 130 to 260 from planting- InspectStop cultivating near the crownThe storage roots radiate out from the base close to the surface. A hoe or fork through one lets rot straight in, so from here on pull weeds by hand near the plant.
- SupportShelter or stake tall plants in windCassava stems are brittle and top-heavy by mid-season. A plant snapped off at seven months costs you the whole crop, so stake exposed plants or grow them behind a windbreak.
- WaterKeep moisture even while the roots swellevery 10 daysThis is when the crop forms. Even moisture builds smooth, well-filled roots; a long drought followed by a soaking makes them crack.
Watch for- Large green hornworm caterpillars stripping the upper leaves
- Standing water around the crown after rain
- Lower leaves yellowing and dropping (the crop is finishing)
Harvest
Day 240 to 300 to the first pull from planting, picking to about day 330- HarvestCut the tops, then lift the whole crownCut the stems about a foot above ground and save them - they are next year's planting stock. Loosen a wide circle with a fork and pull the crown up; the roots radiate out like spokes and snap easily, so dig generously.
- DoProcess within 1-2 days of diggingCassava roots start to deteriorate 24-72 hours after harvest, browning in blue-grey streaks through the flesh. Peel, core and cook, or peel and freeze, almost immediately - this is not a root you can pile in a basket.
- ProtectDig before the first frostFrost kills the tops and rot then travels down into the roots. In zone 9 that means a November dig whatever the calendar says the plant still wants.
Watch for- Frost forecast (dig immediately)
- Roots snapped off and left in the ground (sift the loosened soil)
- Blue-grey streaking inside roots left more than a couple of days
Harvest
- Lower leaves yellow and drop and the stems have gone woody, 8-12 months after the stake went in
- Scraping soil from one crown shows roots 2-3 inches thick and a foot or more long
- Before the first frost - frost-killed tops start rot moving down into the roots
- Cut the tops, then lift the whole crown
- Process within 1-2 days of digging
- Dig before the first frost
Per plant 3 to 10 roots, 4 to 20 lbPicking pull once
Cook with Cassava
Watch out for
6 to know. 3 are high-risk: Root Rot, Spider Mites, Cyanogenic Glycosides (Raw Cassava). 4 are active in September.
Root RotSeverity High DiseasenowThe single most common way home growers lose a cassava crop.
Grow on ridges or raised beds in loose, freely drained ground, and never plant into a low spot that holds water after rain - a season's growth can rot away underground in a fortnight of standing water.
Wilting in the middle of the day on a plant whose soil is damp - the classic tell, and the reason people water a rotting plant and finish it off. Leaves yellowing from the bottom up, dull off-color foliage, and growth that stalls for no visible reason. Whole shoots, or one side of the plant, collapsing while the rest still looks fine. Soft, dark, or mushy tissue at the base of the stem or at the crown, sometimes with a sour smell. Lift a failing plant and look at the roots: healthy ones are firm and pale, rotted ones are brown or black and slimy, and the outer layer slips off between your fingers leaving a thread of core behind. Seedlings that topple over at soil level are the same problem, called damping-off.
There is no cure for tissue that has already rotted, so act on the conditions rather than looking for a spray. Stop watering at once and fix the drainage - open up compacted soil, or move the plant to a raised, sharply drained position or a container. Lift a badly affected plant, cut away every soft dark root and rotted section with a clean blade back to firm pale tissue, and replant only the healthy parts into fresh free-draining soil or mix. Often the better move is to give up on the plant and save its offspring instead: cuttings, offsets, or divisions taken from firm healthy growth root readily and give you a clean start. Bin the rotted material rather than composting it, and correct the drainage before you replant, because the rot comes straight back in the same wet spot.
Drainage is the whole defense. Match the plant to the site first - something that wants sharp drainage will not survive heavy clay or a low, water-collecting spot however well you tend it. Where the ground is heavy, plant on a raised bed, berm, or slope, or grow in a container. Set plants at the depth they were already growing, since burying the crown or the root flare is a common cause of rot, and keep mulch pulled back a few inches from the stem base instead of piled against it. Water the soil rather than the calendar: check that the top inch or two is dry before watering again, cut back hard in cool weather and winter dormancy, and never leave a pot standing in a full saucer. Do not plant or dig in soggy ground, and go easy on rich amendments for plants that want it lean. Rotate annual crops, and start with clean healthy plants and fresh mix.
Root rot is not one organism but a group of soil fungi and water molds - Pythium, Phytophthora, Fusarium, Rhizoctonia and others - that sit harmlessly in most soils and only turn destructive when the ground stays saturated. Waterlogged soil drives the air out, the roots suffocate, and the weakened tissue is invaded and goes soft, brown, and stringy. Because the damage is underground you usually see it first as something that looks like drought: wilting, yellowing, stunting, a plant that does not respond to being watered. Overwatering, heavy compacted ground, a low spot that collects runoff, a pot with no drainage or a saucer left standing full, and cold wet soil in winter are the usual causes. Once roots have actually rotted there is no cure - this is a problem you prevent rather than treat.
Spider MitesSeverity High PestCassava green mite and red mite are among the most damaging cassava pests worldwide, and heavy mite defoliation in the bulking months translates directly into a smaller dig.
Hose the undersides down through hot dry spells and keep the plants from going drought-stressed.
Fine pale stippling or speckling across the upper leaf surface, as though the color had been sandblasted out of it, and later a dull bronze or rusty cast over the whole leaf. Delicate webbing across leaf joints, shoot tips, and undersides - that comes with a heavy infestation and means you caught it late. Leaves that dry, curl, and drop early while the plant looks thirsty no matter how much you water it. Hold a leaf over a sheet of white paper and tap it: the specks that fall and then start walking are mites. With a hand lens, look on the undersides for the mites themselves, pale or reddish, and their round translucent eggs. Damage that shows up first on the hottest, dustiest, most sheltered side of a plant, or on a pot sitting near a radiator indoors.
Start with water. A strong jet aimed at the leaf undersides, repeated every few days for a couple of weeks, knocks populations down and breaks the cycle - on many plants that alone ends it. On anything that regrows quickly, shearing back badly infested growth resets the plant to clean foliage. If it keeps building, spray insecticidal soap or horticultural oil directly onto the undersides where the mites actually live, and repeat every five to seven days for three rounds: contact sprays do not kill the eggs, so a single application always fails. Anything you spray must be labeled for the plant you are treating - follow the label and observe its pre-harvest interval on anything you eat. Predatory mites are an effective release in a greenhouse or on an indoor plant. Above all, correct the heat, dust, and drought stress that caused it, or the mites simply come back.
Do not let plants get drought-stressed - that is the single strongest trigger, and a plant watered steadily through heat is far less likely to have a mite problem at all. Hose the foliage down, undersides included, during hot dry spells: it knocks mites off, washes away the dust they thrive in, and raises the humidity around the plant for a while. Indoors and under cover, keep the air from going hot, dry, and stagnant, wipe or rinse the leaves occasionally, and keep pots away from radiators and heating vents. Inspect any plant carefully before you bring it indoors for winter or set it among others, since mites almost always arrive on something else. Avoid broad-spectrum insecticides: they wipe out the predatory mites, lacewings, and lady beetles that do most of this work for you, and reliably leave you with a worse outbreak than you started with.
Spider mites are not insects but tiny sap-feeding arachnids, smaller than a grain of salt, and you almost always notice the damage before you notice them. They live on the undersides of leaves and drain the cells one at a time, which is why the leaf goes finely stippled with pale dots before it bronzes and dries. They breed explosively in hot, dry, dusty, still air - a generation can pass in a week at high temperature - so a barely visible population becomes a webbed, bronzed plant within a fortnight. Drought-stressed plants and plants wintered indoors in dry heated air are the classic hosts. Broad-spectrum insecticides make matters worse rather than better, because they kill the predatory mites and lady beetles that normally hold mites in check.
Cyanogenic Glycosides (Raw Cassava)Severity High DisorderThis is the defining fact about growing cassava.
The processing is not refinement, it is what turns the plant into food, and it has been part of every cassava-eating culture for thousands of years.
A bitter or soapy taste in raw or cooked cassava, or a tingling or numbing sensation in the mouth - that is the warning, and it means stop and discard. Roots that were not peeled deeply enough, so the pinkish layer under the brown bark is still attached. Pieces still firm in the middle after boiling. Cassava leaves simmered a few minutes rather than boiled long and hard. Any cassava eaten raw, in any quantity, by anyone. Peelings, cores, or trimmings left where children, pets, or livestock can reach them.
There is no home remedy and no way to cook bitterness out - discard any cassava that tastes bitter or numbs the mouth, the whole root, not just the piece. If someone has eaten raw or undercooked cassava and has dizziness, headache, confusion, vomiting, rapid breathing, or weakness, call Poison Control (1-800-222-1222 in the United States) or emergency services immediately and say that cyanide exposure is possible; do not wait to see whether it passes. Do not feed raw peelings, cores, or leaves to livestock or poultry - they are poisoned the same way, and wilted cassava foliage is a known livestock killer.
Grow sweet (low-cyanide) varieties for the table and treat bitter varieties as a specialist processing crop. Peel every root completely, taking off both the brown bark and the thick layer beneath it, and cut out the woody core. Cut the flesh small - chunks, slices, or gratings - so processing reaches the middle. Soak several hours in changed water, or ferment one to three days for bitter types. Then boil until soft all the way through and discard the cooking water before frying, roasting, or mashing. Boil leaves at least 15-20 minutes. Never taste raw cassava to judge it, and keep the raw crop, peelings, and cores away from children and animals.
Every part of a cassava plant contains cyanogenic glycosides - chiefly linamarin - which release hydrogen cyanide when the tissue is crushed, chewed, or damaged. This is not a contaminant or a disease but the plant's own chemical defense, present in every root of every variety. The level varies enormously: sweet varieties carry low amounts concentrated in the peel and core, while bitter varieties carry high amounts throughout the flesh. The peel, the woody central core, and the leaves are always the most concentrated parts, and drought-stressed plants raise their levels. Acute poisoning causes dizziness, headache, vomiting, rapid breathing, and in severe cases collapse; chronic exposure from poorly processed bitter cassava causes konzo, a sudden and permanent paralysis of the legs.
Cassava Bacterial BlightSeverity Medium DiseasenowThe reason the propagation rules in this entry matter: a home grower who saves stakes from a struggling plant carries the disease straight into next year's crop.
Angular, water-soaked spots on the leaves, confined between the veins, that brown and merge. Leaves wilting, browning at the edges, and dropping from the bottom up. Amber or brown gum oozing from stems and leaf scars. Dark streaks in the pith when a stem is cut lengthwise. Shoot tips dying back, and whole plants collapsing in a wet season.
There is no cure and no spray worth using in a garden. Rogue out badly affected plants and destroy them - do not compost the stems - and above all do not save planting stock from them. Where the whole patch is affected, harvest what roots you have and start the next season with clean stakes from a different source on different ground.
Everything turns on clean planting material: take stakes only from vigorous, symptom-free plants, and cut a stem lengthwise to check for dark pith streaking before you use it. Do not move cuttings from an affected patch. Disinfect saws and loppers between plants, never work the patch when the foliage is wet, space plants for airflow, and remove and destroy crop debris at the end of the season rather than leaving it to overwinter. Rotate to fresh ground where you can.
A bacterial disease (Xanthomonas axonopodis pv. manihotis) that is the most serious cassava disease in the Americas. It starts as angular water-soaked spots between the leaf veins, spreads into blight and wilt, and moves down into the stems, where it causes gumming, dark internal streaking, and shoot dieback. It survives in infected stem cuttings and in crop debris, and spreads by rain splash, tools, and handling wet plants - which means the fastest way to plant a diseased crop is to take stakes from a diseased one.
Cassava HornwormSeverity Medium PestnowChiefly a problem in Florida, the Gulf coast, and the tropics, where the moth overwinters.
A single plant defoliated once will normally recover.
Big pellets of dark frass on the leaves and soil under the plant - usually the first thing you notice. Upper leaves reduced to stubs and bare leaf stalks. Fat green or grey caterpillars with a tail horn, resting along the leaf stalks and stems where they are surprisingly hard to see. Sudden, rapid loss of canopy over a few days rather than gradual nibbling.
Hand-picking works and is the practical answer in a home planting - the caterpillars are large, easy to spot once you follow the frass, and there are rarely many. Bt (Bacillus thuringiensis var. kurstaki) is effective on small larvae and harmless to the plant, but does little against big ones, so treat early. A defoliated plant usually refoliates and still makes a crop if it happens once; repeated strippings are what cost you the harvest.
Walk the patch weekly through the warm months and look for frass before you look for caterpillars. Leave the parasitic wasps and predatory bugs alone - they take a heavy toll on hornworm eggs and small larvae - and avoid broad-spectrum sprays that remove them. Clear the ground of pupation sites in a small patch by cultivating lightly between plants at the end of the season.
The large caterpillar of a sphinx moth (Erinnyis ello) that feeds only on cassava and its relatives. Full-grown larvae reach four inches, come in green, grey, or almost black forms, and carry the characteristic hornworm spike at the tail. A population can strip a plant of leaves in a few days, and repeated defoliation during the bulking months cuts the root harvest sharply.
WhitefliesSeverity Medium PestnowWhiteflies are the vector for the cassava mosaic and brown streak viruses that devastate African and Asian crops.
Those viruses are not present in the United States, and keeping it that way is exactly why cassava planting material must not be carried across borders.
Clouds of tiny white insects rising when you shake the plant, flat scale-like nymphs stuck to the leaf undersides, a sticky shine on the leaves below them, black sooty mold over that, and yellowing, weakened growth.
Hose off light infestations, then spray insecticidal soap or horticultural oil onto the leaf undersides where they actually sit. Sprays do not kill the eggs, so repeat every few days for two or three weeks or the population simply rebuilds. Yellow sticky traps knock back the adults, and outdoors natural enemies usually finish the job.
Inspect the undersides of any new plant before it joins the others, and quarantine anything you are bringing under cover or indoors for winter. Avoid crowding and heavy nitrogen feeding, which produce the soft growth they prefer. Hang yellow sticky traps early to catch the build-up while it is still small, and encourage lacewings, ladybugs and parasitic wasps outdoors.
Tiny white sap-sucking insects that cluster on leaf undersides and lift off in a cloud when the foliage is brushed. They weaken growth, and the honeydew they excrete coats the leaves below in a sticky film that blackens with sooty mold. Some species also transmit plant viruses. They breed fast in warm, still, sheltered air, which is why they are far more trouble under cover and on plants overwintered indoors than on the same plant outside.
Good & bad neighbors
Plant nearby
-
The classic tropical intercrop: cowpeas fix nitrogen and cover the ground during the slow first months when young cassava loses to weeds, and they finish long before the roots need the space.
-
Cassava-groundnut intercropping is standard practice across West Africa and Asia; the low peanut occupies the row middles while the cassava canopy is still open, and adds nitrogen.
- Traditional pairings, thin evidence
-
Traditionally interplanted at wide spacing, using the tall corn and the slower cassava on different schedules. Keep the corn thin - heavy shade in the first three months stunts young cassava badly.
Keep apart
- Traditional pairings, thin evidence
-
Two long-season root crops wanting the same loose ground, and digging one wrecks the other. Sweet potato's dense vines also smother young cassava during the months it can least afford competition.
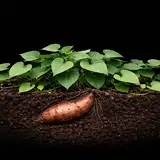
Varieties · 3
You pick one when you add Cassava to your garden. Its days to maturity set your harvest window.
Sweet cassava (low-cyanide) 1 variety
Sweet Cassava
Brown-barked roots with a pink layer beneath and white to pale-yellow flesh, usually 12-18 inches long and 2-3 inches thick.
sweet-cassavalow-cyanidetableThe table cassava - what is sold as fresh yuca in Latin and Caribbean markets and what almost every US home grower should plant. Cyanogenic compounds are lower and concentrated mostly in the peel and the woody core, so peeling deeply, coring, and boiling until soft through is enough to make it safe. Roots are usually shorter and thicker than bitter types and finish a little earlier. Home growers rarely get a cultivar name with their planting stakes; if you are buying stems from a nursery or a grower, ask specifically whether they are sweet or bitter and do not assume.
Bitter cassava (high-cyanide) 1 variety
Bitter Cassava
Indistinguishable from sweet cassava by eye - often longer and heavier-cropping, with the same brown bark and white flesh.
bitter-cassavahigh-cyaniderequires-fermentationThe high-cyanide processing cassava behind gari, farinha, and most commercial starch. It out-yields sweet types and resists pests and pilfering because animals and people cannot eat it off the plant - but it demands the full traditional treatment of grating, pressing or soaking, fermenting, drying and cooking, and it is responsible for the poisonings and konzo outbreaks that make cassava's reputation. There is no way to tell a bitter root from a sweet one by looking at it. Do not plant bitter cassava unless you know the processing and will do it every time.
Variegated ornamental cassava 1 variety
Variegata
Deeply lobed leaves splashed cream and gold, held on bright red-pink stalks; a fast, open shrub to 6-8 feet.
ornamentalnot-for-eatingThe variegated ornamental cassava widely sold across Florida, the Gulf coast, and Hawaii as tapioca plant or golden tapioca, grown for the striking cream-and-gold splashed foliage on red-pink stalks. It is the same species as the food crop and just as cyanogenic - the point worth knowing is that a plant bought purely as an ornamental is not a snack, and its small roots are not worth digging. Grow it for the leaves, keep children from chewing them, and enjoy it as the fast, tropical-looking shrub it is.
Grower tips
Notes from growers, tagged with the zone they grow in. A person reads every post before it appears.
Nobody has posted about Cassava yet. The first one usually saves someone a season.
Free account. Your post shows your grower name and zone, never your email.